Not to be outdone by this module, I started the game at the same place after the total party kill of last time. I got a couple of replies from the Dark City Games forum and it looks like I have a new plan for GM bennies. Of course, after a bit of time at the SW forum, I decided that I would try round 3 if the following GM Bennies rule in place (thanks to Marc for his input):
A GM WC will receive 2 bennies as per the normal rules and will use them in the following instances:
1. Use as a soak roll whenever it receives 2 or more wounds.
2. Remove a shaken result if they are in melee and failed their Spirit roll.
If a GM WC does use a benny (not always possible as you can see), the character that caused the WC to use a benny will receive one.
There is talk about giving out a benny after every combat, but I haven’t felt that is necessary yet so I will hold off on that house rule unless I feel that I need it later.
I couldn’t tell you if it was better die rolling or the above rules, but I managed to kill the dragon without any real issues. A couple bennies are spent, but all characters are alive and well. It only took 5 turns to kill the dragon!
Turn 1: Dragon moves in and breathes fire on Marcus and Merula. Merula manages to move out of the way, but Marcus is stunned (shaken). Marcus fails to recover (must be patting out all those flames), but Merula casts deflection on Janine (spending a benny since she rolled a critical failure).
Turn 2: Dragon goes first again hitting Marcus for 2 wounds, but he soaks one. Nothing else really happens.
Turn 3: Janine does a wild attack to the head and manages to wound the dragon, but it was only one and due to the new rules, the dragon does try to soak it. Ramel heals Marcus (and could have healed 4 wounds).
Turn 4: Marcus failed to recover, but spends a benny; Causing a single wound by attacking the head. The dragon continues to not use its bennies. Dragon can only recover from shaken. Janine does another wild attack to the head and hits for a wound again. Now the dragon has 3 wounds, but hasn’t spent a single benny.
Turn 5: Marcus goes first and hits the dragon causing a fourth wound killing it!
It is odd to have the creature die without using any of its bennies. Especially on the last one when ‘it’ knows it will be killed! Had there been a rule that talks about the final blow, the dragon would have failed the soak roll on the first benny spent, but the second one were had worked to avoid the killing stroke. Of course, that gives Marcus 2 bennies (which puts him back at 3). I’m not sure if I like the way that felt, but for now, I’m going to take the win!
Now to the rest of this module…
Okay, I lied; due to the overwhelming success from before, I was curious if I was just having a good day or if it was something else. I decided to play the scenario one more time.
I did have an issue on the first turn; Marcus hits for 2 wounds on the dragon (he got a joker) and the soak roll didn’t stop any wounds. With the above rule, should the WC NPC try again? My thought is no since it doesn’t “exactly” know if that will be the ‘worst’ attack… but this brings the dragon to 3 wounds and could make the battle really quick! I decided to use the second bennies for the soak roll and it healed one wound. The dragon with two wounds, just recovers from shaken. The second turn starts with Janine hitting the dragon for a wound. The dragon now with 3 wounds can barely recover from shaken. Marcus attacks causes a wound and the dragon is unconscious, but the heroes quickly dispatch it.
Yep, two rounds of combat; with Marcus getting a joker on the first turn and all attacks being a wild swing to the head (at least +0 with no other modifiers, both were higher than that), the dragon went down unexpectedly quickly (not a single benny spent).
I decided to go ahead and finish the module and overall it was a lot of fun. If I remember correctly, this module was online for free before they decided to make these available in print and is probably one of the first. Their style, writing and game flow as gotten much better over the years so I’m a bit disappointed that this was there first conversion. Be warned, there are a couple of conversion issues, but nothing that can’t be solved with a little common sense. Well worth the money if you got the time for a solo game. Hopefully Dark City Games will be pursuing this crossover in the future.
Wednesday, December 9, 2009
Sunday, November 29, 2009
October 7, 986 – Outskirts of Altengard
The alpha creature sniffed the air a second time sure now that there was food to be had at this small dwelling. Not only from within, but there were many large horses about. The real question was, how much blood would be on his massive axe when it was all said and done…
1 Alpha Lycan (Star) - REP 6, AC 4, Move 16, Hardiness 4; Weapon: Massive Axe
Terror, Magic Resist
Massive Axe: IMP 7
CV: 10
2 Brotherhood Lycan - REP 5, AC 4, Move 12, Hardiness 2; Weapon: Arm Blade
Arm blade: IMP 5
Frenzy, Magic Resist
CV: 6
3 Pack Lycan - REP 5, AC 4, Move 12, Hardiness 0; Weapon: Spear
Spear: IMP 5
Frenzy
CV: 2
Total CV: 28
Raid Encounter roll was an 8 so there are 28 CV of locals about. Since this was an inn, I decided that if I rolled doubles, the type would be: Drunk (CV: 1) – REP 3, AC 2, Move 8, Hardiness 0; Weapon: Improvised Weapon (IMP 3). There are no other buildings in the area, but there are four horses found in the corral on the opposite side of the road.
4 Knights, 2 Skirmishers, 6 Infantry (2 inside), 5 Arquebus (2 inside), 4 Drunks (2 inside), 3 Polearms (1 inside)

Stats for the other combatants are in the following format:
Name (REP/AC/move/Hardiness/RNG:IMP)
Knight (5/6/12/0/-:7 or 4)
Skirmishers (4/2/8/0/36:5)
Infantry (4/4/6/0/-:5)
Arquebus (4/3/6/0/24:7)
Polearm (4/3/6/0/-:6)
The defenders are set up in a random fashion. I split the board into 6 areas and I rolled a d6 for each figure. Once the location was determined, I placed them in a spot that I figured would be if they were on patrol. Funny how of the 24 figures only 7 are inside the inn. Word about the Lycans has spread and perhaps this raid is more of a trap???
As the Pack moves closer to the Inn, it appears that the humans are waiting for them. Hopefully how the human are spread out will help them keep their injuries to a minimum.
The alpha moves his group of pack lycans into melee. The human stand their ground in the test of wills (I knew I should have used the star ability and picked 6 successes instead of 4) and the lycans all charge. The arquebuser doesn’t manage to do anything with his shot, but the skirmisher manages to take a lycan OOF with a well-placed arrow! Both Knights hold their own even though they are outclassed. The poor drunk is sliced through without a care by the pack lycan and one of the knights retires a normal move on the crisis test! The Brotherhood lycans are unable to go due to the activation number.
The same skirmisher manages to take out another pack Lycan OOF. The arquebuser manages to hit the alpha, but the alpha shrugs off the blow, roars and moves to engage (with 3d vs 6d rolls well enough to hit, but then just forces a control test which the star ‘fails’ and engages in melee). The knight wants to charge in, but can’t manage to force himself to do it (the alpha star picks ‘6 successes’ and the knight can’t hope to beat him). The rest of the humans move to create groups in order to fight better (or fail to charge the final pack lycan.
 The lone skirmisher on the right is taking out the pack lycans without worry...
The alpha cleaves the arquebuser in half and the skirmisher ‘hero’ routs off the board. A second knight races over to help take out the final pack lycan and after a couple of minor successes manages to run him through (OD result). The rest of the humans stand in wait (I rolled a 6 for the lycans again and a 5 for the humans).
The alpha lycan moves to attack Lord Byron (the leader of this group) but they are evenly matched. The brotherhood lycans finally move into the battle, one charging an arquebuser who fails to hurt him as the lycan comes crashing close. The arquebusers screams of pain force a second arquebuser and a polearm fighter to flee in terror (both failed the crisis test). The second brotherhood lycan attempts to charge the last skirmisher, but halts in place instead (same number of successes on test of wills). The final skirmisher wastes no time in firing at the dumbfounded lycan hitting the foul beast and seriously wounding it (Since they are now within 12 inches, there isn’t a second test of wills so the skirmisher fires her short bow at the lycan rolling 3 successes to 2 hitting it. The result of OOF stands after rolling on the hardiness check)! The alpha seeing that he is outnumbered, fails the crisis test and retires (there are now only 2 lycans remaining).

The alpha retires off the board, but the brotherhood lycan doesn’t get the message. The skirmisher rounds the forest looking to take a shot, but misses and the lycan charges in. The second shot manages to hit, but doesn’t faze the lycan who rends the skirmisher in two which causes the nearest swordsman to flee (and a second to retire). The two knights on the flank dispatch both wounded pack lycans. The final lycan grabs his other brotherhood lycan buddy and flees off the table.
The encounter wasn’t a total loss muses the alpha after a couple of days. Sure the pack is smaller, but the two that survived are more powerful then when they started. Perhaps next time they will dine on horse flesh…
The alpha gained a Social status that it lost by fleeing the battlefield. One Brotherhood went up in REP and both went to hardiness 3.
The alpha creature sniffed the air a second time sure now that there was food to be had at this small dwelling. Not only from within, but there were many large horses about. The real question was, how much blood would be on his massive axe when it was all said and done…
1 Alpha Lycan (Star) - REP 6, AC 4, Move 16, Hardiness 4; Weapon: Massive Axe
Terror, Magic Resist
Massive Axe: IMP 7
CV: 10
2 Brotherhood Lycan - REP 5, AC 4, Move 12, Hardiness 2; Weapon: Arm Blade
Arm blade: IMP 5
Frenzy, Magic Resist
CV: 6
3 Pack Lycan - REP 5, AC 4, Move 12, Hardiness 0; Weapon: Spear
Spear: IMP 5
Frenzy
CV: 2
Total CV: 28
Raid Encounter roll was an 8 so there are 28 CV of locals about. Since this was an inn, I decided that if I rolled doubles, the type would be: Drunk (CV: 1) – REP 3, AC 2, Move 8, Hardiness 0; Weapon: Improvised Weapon (IMP 3). There are no other buildings in the area, but there are four horses found in the corral on the opposite side of the road.
4 Knights, 2 Skirmishers, 6 Infantry (2 inside), 5 Arquebus (2 inside), 4 Drunks (2 inside), 3 Polearms (1 inside)

Here is the setup for the raid. You can barely see the alpha and his pack on the right. The two brotherhood are on the far left.
Stats for the other combatants are in the following format:
Name (REP/AC/move/Hardiness/RNG:IMP)
Knight (5/6/12/0/-:7 or 4)
Skirmishers (4/2/8/0/36:5)
Infantry (4/4/6/0/-:5)
Arquebus (4/3/6/0/24:7)
Polearm (4/3/6/0/-:6)
The defenders are set up in a random fashion. I split the board into 6 areas and I rolled a d6 for each figure. Once the location was determined, I placed them in a spot that I figured would be if they were on patrol. Funny how of the 24 figures only 7 are inside the inn. Word about the Lycans has spread and perhaps this raid is more of a trap???
As the Pack moves closer to the Inn, it appears that the humans are waiting for them. Hopefully how the human are spread out will help them keep their injuries to a minimum.
The alpha moves his group of pack lycans into melee. The human stand their ground in the test of wills (I knew I should have used the star ability and picked 6 successes instead of 4) and the lycans all charge. The arquebuser doesn’t manage to do anything with his shot, but the skirmisher manages to take a lycan OOF with a well-placed arrow! Both Knights hold their own even though they are outclassed. The poor drunk is sliced through without a care by the pack lycan and one of the knights retires a normal move on the crisis test! The Brotherhood lycans are unable to go due to the activation number.
The same skirmisher manages to take out another pack Lycan OOF. The arquebuser manages to hit the alpha, but the alpha shrugs off the blow, roars and moves to engage (with 3d vs 6d rolls well enough to hit, but then just forces a control test which the star ‘fails’ and engages in melee). The knight wants to charge in, but can’t manage to force himself to do it (the alpha star picks ‘6 successes’ and the knight can’t hope to beat him). The rest of the humans move to create groups in order to fight better (or fail to charge the final pack lycan.
 The lone skirmisher on the right is taking out the pack lycans without worry...
 The alpha cleaves the arquebuser in half and the skirmisher ‘hero’ routs off the board. A second knight races over to help take out the final pack lycan and after a couple of minor successes manages to run him through (OD result). The rest of the humans stand in wait (I rolled a 6 for the lycans again and a 5 for the humans).
The alpha lycan moves to attack Lord Byron (the leader of this group) but they are evenly matched. The brotherhood lycans finally move into the battle, one charging an arquebuser who fails to hurt him as the lycan comes crashing close. The arquebusers screams of pain force a second arquebuser and a polearm fighter to flee in terror (both failed the crisis test). The second brotherhood lycan attempts to charge the last skirmisher, but halts in place instead (same number of successes on test of wills). The final skirmisher wastes no time in firing at the dumbfounded lycan hitting the foul beast and seriously wounding it (Since they are now within 12 inches, there isn’t a second test of wills so the skirmisher fires her short bow at the lycan rolling 3 successes to 2 hitting it. The result of OOF stands after rolling on the hardiness check)! The alpha seeing that he is outnumbered, fails the crisis test and retires (there are now only 2 lycans remaining).

How the tables have turned for the lycan. Who knew bows are the way to go!
The alpha retires off the board, but the brotherhood lycan doesn’t get the message. The skirmisher rounds the forest looking to take a shot, but misses and the lycan charges in. The second shot manages to hit, but doesn’t faze the lycan who rends the skirmisher in two which causes the nearest swordsman to flee (and a second to retire). The two knights on the flank dispatch both wounded pack lycans. The final lycan grabs his other brotherhood lycan buddy and flees off the table.
The encounter wasn’t a total loss muses the alpha after a couple of days. Sure the pack is smaller, but the two that survived are more powerful then when they started. Perhaps next time they will dine on horse flesh…
The alpha gained a Social status that it lost by fleeing the battlefield. One Brotherhood went up in REP and both went to hardiness 3.
Friday, November 6, 2009
Savage Worlds - Crown of Kings Round 2
Okay, after mulling over my “defeat” by the dragon in the last episode, I decided to do some research on Savage World combats. Thankfully, right on their website in the download section gives a one page survival guide to SW combat. After downloading, printing and reading, I wanted to face this dragon again with a couple of changes of strategy. Also, I wanted to count the number of rounds and see the time it took. Remember this is supposed to be a RPG game and a two-hour battle would try me as a gamer!
 Here is my setup for the game. The map is under a piece of plexiglass so I can use a wet erase marker to take notes. Notice all the game counters included with the game.
Started @ 2:14
Ended @ 3:07
Result: total party death in 11 turns…. How it happened:
Turn 1: Dragon is shaken by a great attack by Marcus, but it recovers quickly and causes a wound on Marcus after a soak roll. Merula casts deflection on Janine and Janine moves in and attacks the head (called shot), but fails to cause any damage
Turn 2: Dragon gets a joker and hits Marcus for 4 wounds and he begins to bleed out. Ramel fails to heal Marcus.
Turn 3: Marcus dies (a roll of 2 – 3 = death). Ramel intimidates the dragon with a success?!? Dragon recovers and hits Ramel but rolls a 6 for no result
Turn 4: Dragon again hits Ramel but only shakes him. Janine wild attacks to the head (the modifiers are in her favor; +1 for gang up, +1 for trademark weapon, +2 for wild attack and +2 for dragon’s size with the –4 for a called shot) and connects with a 27 (3 wounds). Of course, if the dragon gets the two GM Bennies, it uses one to soak. An awesome roll of 17 completely negates the damage.
Turn 6: Ramel hit for 3 wounds and is unable to soak them.
Turn 8: Janine hit for 5 wounds and soaks 1. On the Incapacation Table, she scores a raise meaning she is stunned, but is busted (die type loss to strength).
Turn 10: Janine hit for 5 more wounds and starts to bleed out. Ramel tries to flee combat, but is hit for 2 wounds. He also starts to bleeds.
Turn 11: Janine continues to bleed out; Ramel expires. Dragon hits Merula for 1 wound (she soaks 2), then two more wounds on the second attack. She Full defenses and tries to run, but gets hit while fleeing and receives another wound going unconscious…
Now I’m curious if my “new” play style is the cause of death or the awesome rolling/cards for the dragon at the beginning of the combat. I’m feeling that my tactics were sound, but the awesome cards that the dragon got was what did me in. Also, the two GM Bennies that I gave the dragon saved it when Janine did her wild attacks to the head. I sent a message to the Dark City guys to see if I’m suppose to be giving GM Bennies out, but I haven’t got an answer yet. Again, I’ll “reset the power button” and go at this again…
Friday, October 30, 2009
Savage Worlds - Crown of Kings
The Crown of Kings is an adventure module produced by Dark City Games. Constructed as a sort of “choose your own adventure” game that can be played solo. Recently, they have started to convert some of their modules for Savage Worlds. Now, I purchased this “Savaged” adventure a long while ago, but due to the amount of time the free trial module took to play, I was leery of playing through this adventure. Don’t get me wrong I love the stuff that Dark City Games produces, but as a scripted solo game you don’t get many replays once you have completed the ‘entire’ module. Trust me, in playing their games, there are times that you really need to go back to a ‘save point’ and start again. I can’t tell you the number of times playing through their system (an offshoot of melee/wizard) that I’ve been killed by the die rolls!
Of course, I picked up the Savage Worlds Fantasy Companion so after reading I really wanted to use my now two (err… three) savage world books. I’m a big fan of the Savage Worlds game rules so any time I can get a chance to play, I’m all for it! My new spark for playing this game is that I’ve been reading a great web comic called Clockworks that is based on a RPG using the Savage Worlds rules. So, I got everything ready to play and waited for a couple hours free time to have at it…
Since it is a scripted adventure, I don’t want to spoil too much of the game, but since you get monster counters in the game, I feel like I can give some highlights…
It was all going pretty well until I met a dragon! Unfortunately, the module doesn’t give any rules on Game Master Bennies (or if you should even get any). I ruled that the module itself doesn’t get any GM Bennies, but Wild Card (WC) creatures would. I also ruled that the WC creatures would use their Bennies only for wound soak rolls. Also, critical failures by wild cards would result in a shaken result. In the end, I might have made the dragon harder than the writers’ intended. With the creature rolling d12+4 and d8 for damage, my characters were in a world of hurt if they got hit. Once the Bennies were all gone, characters starting to take wounds. On my end it was easy to hit the dragon, but with a toughness of 15 I really needed to hit with a raise and roll pretty well on my damage roll. In the end, Ramel was killed (got 4 wounds and with two bad vigor rolls died).
Fights with a WC with a high toughness also take a lot of time at least it did for me. I didn’t count the number of rounds that I was fighting and I admit that I had to look up the rules a lot, but it still took me 2 hours to fight the dragon!
I’m pretty sure that this was one of the major fights of the module, but I’m not sure that I’ll be able to make it through the rest of the adventure with only 3 characters - all of who are out of Bennies or Power Points.
To Be Continued (with pictures hopefully)...
Saturday, September 19, 2009
The Velikimrav Nest
October 15, 986 Outskirts of Altengard
Even though Mattis gave Randell some ideas on how to locate a velikimrav nest, Randell hadn’t had any luck actually locating one. Of course, with the rarity of said velikimrav nests, he wasn’t discouraged. Hopefully with a little luck, one would be found before too much time had passed. With the Lycans still at large, time was precious…
Game Notes: "Quest: Is it here?" Result: 4 – Not in the area. Roll for an encounter normally. Result: No encounter
November 2, 986
After weeks of searching, Randell has finally found the signs of a velikimrav nest. He and his current band venture into the cramped tunnels below the earth. The ground gapes open to reveal a fairly large chamber with a single exit. After a quick look about, the party heads deeper into the lair. Moving off into the side passage, the party heads down a very large passageway that ends in a right turn (T1: 2/4). Due to the difficult terrain, it takes them a bit to move down the corridor (T2: 6/3, T3: 2/4). So far, there hasn’t been any sign of occupants.
In a second long corridor, a section of the floor gives way under Andus, a swordsmen. He falls hurting himself very badly (in the second corridor, there was a level 5 trap. The trap randomly attacked a party member, which was a swordman. The trap rolled 5d and the swordsmen rolled 4d. The trap got 4 successes to the swordsman 2. On the firing table, it was determined that he was OOF). After getting Andus out of the collapsed tunnel, Randell orders the party to continue. He can’t turn back now; too much time has been lost in search of this nest.
Continuing down that same corridor (T4: 5/2), the lone passageway continues as it weaves under the ground (T5: 4/1). As the party turns the corner and sees a end to this passageway, a part of the ceiling gives way and Daniel jumps out of the way barely escaping from harm (Again there was a level 5 trap. It randomly attacks a different swordsman, but the trap scored no successes and the swordsman scored 1 stating the target was unharmed and the trap disarmed) – Of course, since there is no humanoid enemies in this dungeon, I continue to make the traps more accidents).
Entering a very cramped chamber (T6: 1/3), Randell and the party discovers some velikimrav sulking about. Blades are drawn with the hope of eggs (Two of the 3 PEFs were to be resolved in this room. The first PEF was nothing, but the second was considered the main body. A roll determined there would be 1.5 times more than the party. Since the only thing to be found in this nest was velikimrav, I kept adding them until the maximum CV was reached. In this case, there were going to be 4 in the room. To determine if there were any eggs in the chamber, I rolled on the Loot and Booty chart modifying as follows. Roll 2d6, for every point over 7, one nest containing eggs were to be present. The roll was a 4 so no eggs were in the chamber).
Game Notes: The room is only 2w in area (1.5 x 3 inches – I modified it to be 2x4”)! I continued to map the passageway so the velikimrav would have enough room to be deployed (yes, with the passageways all at 3w, they are considerably larger than that of the chambers). To make things easier on my self, I changed the 3w passageways to 4” which allows me to use some stuff I got laying about for the rooms and passageways!
 4 Velikimrav, but no eggs to be found. At least not in this part of the cavern!
Randell and the party see the velikimrav and with a battle cry, charge blandishing their weapons. The velikimrav that is charged by Randell senses the magic sword and rout! Seeing one of their kind retire, two others also leave leaving a single enemy (The test of wills has the party pass 3 more successes and then the velikimrav only get a single success in the charge test – due to Randell being a star, he picks 4 so the party charges and that velikimrav routs. Due to the rout, two more also flee). Randell and the creature battle each other, but it’s obvious that the Randell is out matched and is wounded and OOF (Randell gets only 4 dice against the velikimrav who gets 6 dice – 4 for REP, 1 due to protected and another 1 for larger base. After a couple of pushes back and forth, the velikimrav scores 2 more success than Randell. The following hardiness test has Randell passing 1D causes him to lose his last two dice putting him OOF). Two of the swordsmen see Randell downed by the creature and retire from the nest, but the lone arquebusier runs out of the cave screaming!
(T6a:5/2): Tealwood grabs Randell’s body and attempts to get out of this nest with their lives while having Daniel pickup Andus. The velikimrav charges Tealwood and wounds him twice in a row putting him OOF. The rest of the party flees the cave once Tealwood is downed!
 Tealwood attempts to pull Randell from harm to no avail! The velikimrav win this day!
Randell wakes up on the cold ground of the cave. Surprised to be alive, he looks over and notices Tealwood close by. It looks like the velikimrav are nowhere to be found. Randell quickly wakes up Tealwood, grab their dropped gear and they stagger back to the Compess. Perhaps I need a bigger party before I head into the second nest thought Randell has he recovers his wounds. The days drawn on, but soon the entire party is back on their feet (some of the party is worse off, but there is nothing one can do about that). They have lost precious time since they had to journey back to Compess. Once it all said and done, seven days pass before they are well enough to head back out on their quest to destroy the Lycan.
Game Notes: Both Randell and Tealwood survive their OOF result without any issues, but one of the swordsmen (the one I called Andus) and the arquebusier (now called Tobus) lost a point of REP. Between encounters, a number of days pass equal to the roll on 4d6 (so on average two weeks pass per encounter). This is a change of the rules, but I have my reasons. Since my star went OOF, it adds recovery time to the roll for time between encounters depending on the amount of ‘care’ that can be provided. Compess is a town and it takes an additional 2d6 for recovery (cities are 1d6 and wilderness is 3d6).
Saturday, September 12, 2009
Randell's Quest 2 - Dangerous Dealings?
This is a continuation of the previous game that I ran. I decided that it would be fun to continue the tale of Randell so I started thinking about how to play this out. It occurred to me that I could take some elements from the other THW games and make this into a little mini campaign of sorts. Besides I have the rules in my head. Why clutter things up!
"I need more men!” stated Mr. Randell staring at the commander of the small outpost near the Timmerland Estate. He and the men that he had taken with him had recovered their wounds nicely under the direction of the staff here, but he couldn't get the commander to budge on even a single conscript.
"I've heard the tales of the Lycan issue, but we just can't spare any of our defenses. All our resources are currently protecting the towns and roads in the area. We just can't send any more people with you, but you can continue to use the services of Captain Tealwood. He's the best we got! I'm sorry, but you will just have to find a different way."
Randell stormed out without any words. Words were pointless and would not help clean the infection in his lands. Simply put, the Lycan had to be exterminated! What really got under his skin was there were humans helping the Lycans! These Wolfen Cultists would not taint his homelands. If he ever caught one of those cultists, there would be no trial; just a confession and execution. With his dwindling force, he needed an edge. Perhaps a trip to his friend, a local friar would be in order…
A short while later, Randell makes his way to the Village of Compess where his old friend Brother Mattis resides. The village is small and Randell finds Mattis quickly, but it seems that there is something on Brother Mattis' mind... Once the pleasantries are complete, Randell gets down to business.
Game Notes: I worked out if Mattis was to be found using the Larger than Life (LTL) rules also from THW. The Difficulty to find Mattis was 2 (rolled a 5 & 2) and our star passed 1 more die than the quarry so they meet up but with complications. Since in WHAA you only have REP (and no skills) I decided to roll just based on their REP for the outcome of their chat. I determined that Randell would get information to help his quest if he won the opposed task. If Randell failed, he would have to complete a side quest for Mattis in order to get the information he needed. After a bit of discussion (and two more complications), Brother Mattis agrees to give the help Randell needs!
"Brother Mattis, there are Lycans in the area. They must be stopped before any more deaths can occur. My men and I need something to give us the upper hand!”
"I have read tales of a creature called the Velikimrav that might help you in your quest. It is said that the Velikimrav eggs have a potent substance on them! Properly distilled, it’s said to weaken even the most hardy ofcreatures! Beware, the Velikimrav are known for protecting their lairs and eggs with great fervor!"
"Just direct me to these eggs, my good friend..."
Stay tuned for the next installment. Will Randell be able to acquire some of these Velikimrav eggs or will this quest lead him to his doom?
Sunday, September 6, 2009
The Timmerland Estate Affair
When reports of fiendish creatures found their way onto the Prelate's desk, he had no choice than to send a contingent of men to investigate. His first choice was the famed Witch Hunter Randell Burrie. To aid Randell, he sent the capable captain Tealwood and a group of determined soldiers. Since the latest report was at the Timmerland Estate, Mr. Burrie headed there to check the disturbance.
Mr. Randell Burrie (star) - REP 5, AC 3, Hardiness 3; Weapon: magical sword & pistol.
Pistol: IMP 7, RNG 6
Magical Sword: IMP 5, -1 to opponent’s hardiness
Dual Class
CV: 6
Captain Tealwood - REP 5, AC 4, Hardiness 2; Weapon: sword & dagger
Sword: IMP 5
Elite Melee Trained
CV: 5
4x Arquebusiers - REP 4, AC 2, Hardiness 0; Weapon: arquebus & dagger
Arquebus: IMP 7, RNG 24
Dagger: IMP 4
CV: 1
6x Swordsmen - REP 4, AC 4, Hardiness 0; Weapon: sword & shield
Sword: IMP 5
CV: 1
Total CV: 21
Quest goal: Check both buildings for survivors and check all the PEF on the board.
For ease, all PEF have a REP of 4.
The heroes split up with each controlling 2 arquebusiers and 3 swordsmen.

T1(2/1): Soldiers move first. Randell moves up the road and Tealwood moves to the right getting LOS to one of the PEFs, but it was just some unfettered farm animals...
T2(4/4):
T3(1/4): One PEF moves into the complex, the other moves directly towards Randell's party. Randell and his group moves up looking for the enemy, but finds nothing of note.
T4(1/1):
T5(5/2): Both Hero groups move up towards the buildings. The main body of the Enemy force (as a PEF) moves around the building coming into sight of Randell's group. It consists of: 1 Alpha Lycan (Big Bad), 2 Brotherhood Lycan, 3 Pack Lycan, and 4 human cultists (it's been a while since I've read the book and didn't understand the gaps for the recruit column in the Lycan Brotherhood so I just decided to improvise). It turns out that there were so many enemy figures that they didn't all fit in the space around the house. Decided to place the human cultists in their own separate group coming out of the house's front door...

1 Alpha Lycan (Big Bad) - REP 6, AC 4, Move 16, Hardiness 4; Weapon: Massive Axe
Terror, Magic Resist
Massive Axe: IMP 7
CV: 10
2 Brotherhood Lycan - REP 5, AC 4, Move 12, Hardiness 2; Weapon: Arm Blade
Arm blade: IMP 5
Frenzy, Magic Resist
CV: 6
3 Pack Lycan - REP 5, AC 4, Move 12, Hardiness 0; Weapon: Spear
Spear: IMP 5
Frenzy
CV: 2
4x Swordsmen Cultists - REP 5, AC 4, Move 6, Hardiness 0; Weapon: Sword & shield
Sword: IMP 5
CV: 2
As soon as both enemy groups appear, they encounter a hero group within 12" and both separately test a Test of Wills (as least that's what I went with). The cultists get the drop on the captain's men and they test to charge! As they move in, one arquebusiers draws a bead on the lead cultist and fires but misses. The two groups merge in a scrum. The cultists are able to get numbers on a swordsman scoring a telling blow and putting him OOF (5 dice are rolled for the cultist and only 3 dice for the swordsman). The first cultist scores 2 more successes and takes the swordsman OOF). Captain Tealwood manages to do a bit better fighting both cultists beating them both back but when he is in single combat, the cultist holds his own (Tealwood won with a single success pushing them back 1", then when he was by himself the combatants rolled the same number of success and the combat ends).
The bulk of the Lycan's come in view of Randell's group and even though terror griped the men's hearts, they charged the beasts! A single swordsmen made contact with a Pack Lycan and manages to hold his own at the start of the combat (the Lycan was rolling 8 dice - 5 for REP, +1 for frenzy, larger base and the spear to 4 dice. I managed to roll only 2 successes for the Lycan rolling 4 sixes and 2 fives. The swordsman actually won by 1 success)! But the Lycan pushes the swordsman back and the end locked in combat (the Lycan wins by one and pushes the swordsman back and the finally roll equal the fight is over)! The captain seeing his share of wounded push on, but one of the swordsman stammers back.
T6(4/2): Both arquebusiers fire at one of the cultist but both miss. The swordsmen move to attack the cultists. It looks grim for the Captain's men as another Swordsmen is OOF (a lot of die rolling, but the better REP cultist continue to prevail).
A second swordsman moves to fight the Lycan, but the man that moved up is no match for the Lycan and is OD!
The other two continue to parry attacks! Randell sees an opening on a cultist once the swordsman fighting him is OOF, but misses. A couple swordsmen move back to regroup as reaction to their fallen comrades.
A pack Lycan and the Alpha fail their charge test and stand back. The rest of the Lycan forces moves in and a huge melee about the complex starts!

Mr. Randell Burrie (star) - REP 5, AC 3, Hardiness 3; Weapon: magical sword & pistol.
Pistol: IMP 7, RNG 6
Magical Sword: IMP 5, -1 to opponent’s hardiness
Dual Class
CV: 6
Captain Tealwood - REP 5, AC 4, Hardiness 2; Weapon: sword & dagger
Sword: IMP 5
Elite Melee Trained
CV: 5
4x Arquebusiers - REP 4, AC 2, Hardiness 0; Weapon: arquebus & dagger
Arquebus: IMP 7, RNG 24
Dagger: IMP 4
CV: 1
6x Swordsmen - REP 4, AC 4, Hardiness 0; Weapon: sword & shield
Sword: IMP 5
CV: 1
Total CV: 21
Quest goal: Check both buildings for survivors and check all the PEF on the board.
For ease, all PEF have a REP of 4.
The heroes split up with each controlling 2 arquebusiers and 3 swordsmen.
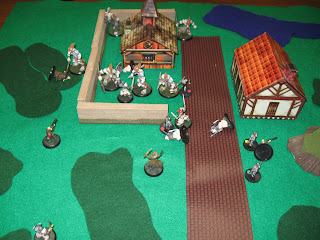
The situation at the start of the game. The question mark tokens are the PEF markers (there is one hidden behind the left building).
T1(2/1): Soldiers move first. Randell moves up the road and Tealwood moves to the right getting LOS to one of the PEFs, but it was just some unfettered farm animals...
T2(4/4):
T3(1/4): One PEF moves into the complex, the other moves directly towards Randell's party. Randell and his group moves up looking for the enemy, but finds nothing of note.
T4(1/1):
T5(5/2): Both Hero groups move up towards the buildings. The main body of the Enemy force (as a PEF) moves around the building coming into sight of Randell's group. It consists of: 1 Alpha Lycan (Big Bad), 2 Brotherhood Lycan, 3 Pack Lycan, and 4 human cultists (it's been a while since I've read the book and didn't understand the gaps for the recruit column in the Lycan Brotherhood so I just decided to improvise). It turns out that there were so many enemy figures that they didn't all fit in the space around the house. Decided to place the human cultists in their own separate group coming out of the house's front door...
The PEF is transformed into 10 figures. There isn't enough room to place all the models behind the building...
1 Alpha Lycan (Big Bad) - REP 6, AC 4, Move 16, Hardiness 4; Weapon: Massive Axe
Terror, Magic Resist
Massive Axe: IMP 7
CV: 10
2 Brotherhood Lycan - REP 5, AC 4, Move 12, Hardiness 2; Weapon: Arm Blade
Arm blade: IMP 5
Frenzy, Magic Resist
CV: 6
3 Pack Lycan - REP 5, AC 4, Move 12, Hardiness 0; Weapon: Spear
Spear: IMP 5
Frenzy
CV: 2
4x Swordsmen Cultists - REP 5, AC 4, Move 6, Hardiness 0; Weapon: Sword & shield
Sword: IMP 5
CV: 2
As soon as both enemy groups appear, they encounter a hero group within 12" and both separately test a Test of Wills (as least that's what I went with). The cultists get the drop on the captain's men and they test to charge! As they move in, one arquebusiers draws a bead on the lead cultist and fires but misses. The two groups merge in a scrum. The cultists are able to get numbers on a swordsman scoring a telling blow and putting him OOF (5 dice are rolled for the cultist and only 3 dice for the swordsman). The first cultist scores 2 more successes and takes the swordsman OOF). Captain Tealwood manages to do a bit better fighting both cultists beating them both back but when he is in single combat, the cultist holds his own (Tealwood won with a single success pushing them back 1", then when he was by himself the combatants rolled the same number of success and the combat ends).
The bulk of the Lycan's come in view of Randell's group and even though terror griped the men's hearts, they charged the beasts! A single swordsmen made contact with a Pack Lycan and manages to hold his own at the start of the combat (the Lycan was rolling 8 dice - 5 for REP, +1 for frenzy, larger base and the spear to 4 dice. I managed to roll only 2 successes for the Lycan rolling 4 sixes and 2 fives. The swordsman actually won by 1 success)! But the Lycan pushes the swordsman back and the end locked in combat (the Lycan wins by one and pushes the swordsman back and the finally roll equal the fight is over)! The captain seeing his share of wounded push on, but one of the swordsman stammers back.
T6(4/2): Both arquebusiers fire at one of the cultist but both miss. The swordsmen move to attack the cultists. It looks grim for the Captain's men as another Swordsmen is OOF (a lot of die rolling, but the better REP cultist continue to prevail).
A second swordsman moves to fight the Lycan, but the man that moved up is no match for the Lycan and is OD!
The other two continue to parry attacks! Randell sees an opening on a cultist once the swordsman fighting him is OOF, but misses. A couple swordsmen move back to regroup as reaction to their fallen comrades.
A pack Lycan and the Alpha fail their charge test and stand back. The rest of the Lycan forces moves in and a huge melee about the complex starts!
At this moment, three of the swordsmen are either OOF or OD. The cultist have managed to get the arquebusiers into the fray.
A cultist takes an arquebusier down, but the other holds his own! The Captain is pitted against two opponents, but only pushes them back. Randell gets into melee with a Pack Lycan is outclassed and is wounded, but survives the onslaught. A second arquebusier is killed by a Pack Lycan. Both an arquebusier and a swordsman flee off the board and even Randell chooses to retire. At the end of the turn, the heroes are in bad shape. Only 1 arquebusier, 2 swordsmen, Tealwood and Randell are alive.
The remaining heroes are attempting just to stay alive.
T7(1/2): The final arquebusier is killed by a Pack Lycan and the heroic swordsman is finally killed. Captain Tealwood survives the attack as does Randell, but is startled not once but twice in the combat! On their turn the remaining heroes retreat off the board.
The Aftermath: The two routers and two wounded swordsmen return to base, but the other figures are never heard from again. All in all 2 swordsmen and 3 arquebusiers are killed in the exchange with none of the enemy even being taken out of the fight. Our heroes will want revenge!
Notes: This game was inspired by the games that were played a couple of weeks ago on the yahoo group for Two Hour Wargames, but I never got a chance to play them until now. Once I got the rules in my head, the game went pretty fast. I forgot due to the speed in some places to actually take pictures and the like, but all in all, a good time. I have some questions about the rules, but I’m sure they will get answered quickly on the yahoo group dedicated to the many THW game systems.
Tuesday, August 18, 2009
The Great Gencon Giveaway!
Okay, so perhaps not really a giveaway, but I did manage to sell off a bunch of my boardgames! It seems that though the years, I have amassed quite a collection of boardgames. All told my collection is well into the 100 range. Of course, that means in order to play every boardgame that I own, my friends and I have to play 2 games a week, every week for an entire year!
So, after reading a couple of blogs about trying to manage the size of our addictions ( http://yearoffrugalgaming.blogspot.com/ ), I decided to lower the number of games that I have. To that end, I went and took stock at my ever increasing game library and I noticed that I had to cull the herd. With one of the largest gaming conventions (www.Gencon.com) an hour away, I set out to take a number of my games for sale. My thought was I’d take a couple of the games that it was obvious that we weren’t going to ever play and get some spending money. Two large plastic tubs and about 30 games later, I traveled to the convention center to see if I could make some money. I used boardgamegeek.com as a starting point for the selling price, but I also allowed for the price to go down over the three days (100% the first, 90% the second and 75% the third). My thought was that even 75% of what I wanted was better than having to lug all the unused games back to my house.
The only downer was the commission cost for the service! They took 15% of the final sell price as a commission fee and there was an initial cost to place it in the store (50 cent per game if placed into the store and 1 dollar is placed into the auction).
Of the 30 games I took to the convention only 4 didn’t sell! My totals were $586.00. After the $87.90 commission fee (and the 16 dollar initial fee), I made out with $482.10. Of course, a lot of that was spent at Gencon, but it’s nice to have the entire convention paid for by stuff you sell! Now that I got rid of about a third of my collection, I don’t feel too bad picking up the occasional boardgame again!
Monday, July 6, 2009
The Great Mage Knight Conversion
Half way through working through my idea for the Murky Caves (my Origin’s game for SBH), I knew that I was going to need a bunch more miniatures if I was going to have enough to run the dungeon as I wanted. I had bought a bunch of D&D singles (pre painted plastic miniatures), but it was just not going to be enough. After determining exactly how much I had spent on stuff, I remembered that I had a lot of old Mage Knight figures that hadn’t seen the light of day for a while.

(You can see the number of empty bases from the now converted figures)
Preparing the Figures
I needed to get the miniatures off click base. There were two main reasons for this. First the base is 1.5” around which was too big for my purposes (most of my stuff is on a 1” base) and second, I had to hide the click nature of the miniature.
1. I found the best tool for the job is a razor blade scraper (used to remove paint and such from glass). Carefully slide the blade under the miniature until it pops off. Some were relatively easy and some took a little work.
2. I found a great deal on wooden disks online somewhere so I wanted to use them. The only major problem is that superglue won’t attach a miniature to the disk. In the end, I used a two-part epoxy and it worked great. Remember that the fumes that are produced are dangerous – have decent ventilation! As you can see I have two wooden disk sizes available a normal 1” disk and a larger 1.5” disk.
3. After the epoxy dries (mine only took about 10 minutes), paint the base black. This is mainly due to the fact that all my D&D miniatures are a simple black base and they fit right in.
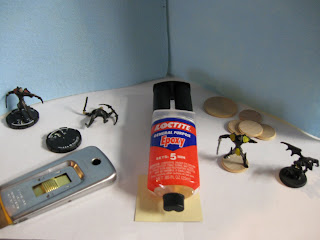
(From Left to right: a starting MK figure, the scraper used, the same model off the base, the epoxy I used, the wooden disks, a model on a disk and the figure on the black painted base)
I hope to go back and repaint some of the MK figures. Most of my come of the earlier sets and the paint job is really bad. Hokey in some respects! I’d also like to finish the bases on some of them to make then stand out less, but it’s definitely not a priority.
(You can see the number of empty bases from the now converted figures)
Most of my MK collection is from the dungeons series that came out. I have the whole line of heroes that I should go ahead and convert as well. More so now since I really don’t have enough of playable mage knight figures!
Sunday, July 5, 2009
Origins 2009 Report
Finally Origins has come and gone and I can finally stop working on the games I’m running and start working on actually playing games. At least I can say that a good understanding of what to do and what not to do for conventions. For those who don’t know, Origins is a gaming convention that takes place around the end of June in Columbus OH (its official title is Origins Game Fair). It’s a five day event that has a little bit of everything a gamer would want! Board games, miniature games and RPGs go on throughout the day.
Thursday
We got to the convention center around 10am and after a brief visit to get my badge and a small tour around the miniatures room, it was time to check out the Dealer’s Hall. I used a lot of restraint and didn’t buy anything, but I used the time to mark where I would be making the trip back at a later date.
At 1pm, I headed to play in a Fear and Faith (F&F) demo by Ganesha Games ( http://www.songofblades.blogspot.com/ ). When I got there, Andrea (the designer) was explaining the rules for the game. I jumped in as the zombie player and got trounced handily. It turns out that my opponent had played the fantasy version of the game and wanted to see the differences. Of course before I sat down, each of the human survivors were given a single grenade. It was a slaughter! Still fun though.
2pm was a Battlestations game by Gorilla Games ( http://www.battlestations.info/ ). Again I got to play with the designer (Jason) and they were trying out their new expansion that will be released at Gencon. For those that have never played, Battlestations is a light RPG/board game that the players are all characters on a space ship completing missions for the UREF. Each character has a race (which gives a special ability), 5 stats (Engineering, Piloting, Combat, Science & Athletics) and a profession. Mechanics are simple (2d6 + stat vs. Difficulty number) and the action is quite entertaining. There are rules to advance your character and the like (and with clones, you can never truly die if you don’t want to). The game was a blast and I had so much fun, I went back for more.
Every year, my friends and I head to Schmidt’s for “Sausage fest” ( http://www.schmidthaus.com/ ). They have an all-you –can-eat sausage buffet with all the trimmings. Add a 32 oz beer and a cream puff for desert and you got a German experience to knock your socks off! It’s been a tradition since we starting going to Origins and I’m sure it will continue!
I did get to play a demo of Squadron Strike ( http://www.adastragames.com/ ). Once you get your brain wrapped about the 3D nature of the game, it’s pretty fun. I wanted to play in a full fledge ship to ship battle before I made any commitment. Unfortunately for me (but fortunately for my pocket book), I never got into a full battle over the weekend…
Friday
9am: I actually ran a Starmada: Battlestar Galactica game ( http://www.mj12games.com/ ). I had 2 players show up so I gave them two ships apiece and let them tear into each other. Due to the amount of work that I was doing for the SBH game, I didn’t have much in the way of scenario or terrain, but the players didn’t seem to care! In the end, the colonial forces wiped out the Cylon attack force with minor damage to the Pegasus.

1pm: I had a single player for my Song of Blades and Heroes game from Ganesha Games so after a quick rule discussion, we started playing the game. The player caught on really quick and it was good fun. It’s too bad more people didn’t want to jump in, but that’s due in my opinion two major reasons. One, the Warlord/Reaper guys already do a huge dungeon game complete with an awesome Hirst Arts( http://www.hirstarts.com/ ) setup (something I didn’t have with my converted Mage Knight figures and simple vinyl dungeon tiles). Secondly, there was a ton of SBH games running throughout the convention (too much of a good thing can still lead to too much). 

After a quick peek into the Dealer’s Hall (I played the reprinted Tales of the Arabian Nights board game by Zman games – which I would have bought had they not sold out of it) and a little dinner, it was back to the miniature hall. I went to play a playtest of the Tales of Blade and Heroes, the new RPG from Ganesha Games. Personally, I’m a little leery of playing RPGs at conventions having too many bad experiences to count, but I really like the miniature system and the designer is awesome so I figured what the heck… Also, I wanted to see if I could adapt the rules for use as an expanded SBH miniatures game. The system was quite entertaining (the exploding 6 mechanic and the boosts were a great) and although I don’t think I’d ever play it as a pure RPG game, it has a ton of potential for use in the SBH miniature game.
Saturday
9am: Again a Starmada: Battlestar Galactica game and this time I had six players (I even had someone with generics, but I just didn’t have the space). Each player had a single miniature (granted it was about 1000 pts worth) and it was a slugfest. In the end, the Cylon players managed to destroy the Atlantia and cripple the Pegasus having only minimal damage to a single baseship. I was pretty glad that the scenario yielded a 1-1 overall!

~2pm: Due to the previous game running a bit long and the reasons above, I didn’t have any players for my second SBH game on Saturday. It’s unfortunate that I spend all the time, energy and money getting the game ready and not having any players, but there wasn’t much I can do. Thankfully most of the stuff that I prepared for the SBH game, I can reuse for my own personal games so I’m not too worried! Actually, I learned some valuable lessons in game presentation and scenario design that should help me in the conventions to come. I was a little disheartened, but I used my new found freedom to get into a second Battlestations game (Note: the second game was great has well. I tip my hat to the brothers).
~7pm: Due to dinner running over, I was unable to make it back in time for either of the games I wanted to play in. The first was a Hordes of the Things (HOTT) tournament. I did stop by and watch some of the action, but never got into a game. The second was a game using the “With Hostile Intent” rules (a great name for a spaceship combat game in my opinion). In the end, I spent the time moving from table to table watching all the different games being played.
Sunday
8am: I played in a Ghostbuster game that was a blast. The presentation was wondrous and the game play was perfect for early morning of the last day. We defeated the bad guy (you know the one) and walked away with a cool sticker showing off my ghostbuster skills (not mine, I couldn’t hit anything really).

The rest of the day was making my way back into the dealer’s hall to buy all of my needed purchases. I learned how to play Steam – the ‘remake’ of Age of Steam. It’s more forgiving than AoS so I might buy that as soon as Tales of Arabian Nights arrives. Due to a calculation error, I spend a little more than I wanted to, but nothing that I can’t handle pending I don’t buy any miniature stuff for a while (like until Gencon).
Notable purchases:
All Things Zombie (ATZ): Haven – I even got a quick demo by the Ed (the designer). I really need to finish my zombies and pick up some modern figures for use in ATZ and F&F. As an added bonus, I got 5150 book 1 for 10 bucks ( http://www.twohourwargames.com/ )!
Song of Splintered Lands: I knew that this was going to be an auto-buy since I have all the rules in the SBH series. What I didn’t know that I would be leaving the booth with ~50 dollars worth of their beautiful 15mm figures. I’m in the process of removing 15mm from the scales I play in, but these miniatures are beautiful and work awesome side by side with the larger 28mm cousins.
Savage Worlds – Fantasy Companion: This was a complete impulse buy for me, but due to a blog that I follow I picked it up. I have used the Savage World system for Dark City Games solo adventures and I’ve also seen people using the Savage World rules for purely miniature game so I figured that this would help me expand the rules ( http://www.peginc.com/ ).
Spaceship models: I bought a second Prometheus from the Iron Wind Metals booth ( http://www.ironwindmetals.com/ ) . The one I have will need some serious work since the engine piece doesn’t match up with the ship hull. I figured that I could use the second one for some serious BSG actions! I also bought a couple of ships from Ninja Magic ( http://www.ninjamagic.com/ ). Mainly the main colony ship from Homeworld and a couple of BSG inspired ships that actually are in the BS Prometheus fan story.
Dominion: Intrigue – The expansion for Dominion was out and I saw people walking about with it all weekend. The game itself is a good one so I really wanted to pick up the expansion. I have not been disappointed yet, although the new actions cards are a bit strange. I’m not sure why they needed to make it a fully playable game on its own (it has the needed VP and money cards), but I’m not going to let that harm my view of the game.
Final Thoughts
Origins Game Fair is always a great time! I enjoy the weekend of gaming and although I didn’t get to play all the games I wanted to, it was still a lot of fun. Now I have to relax and read all the books I bought from the convention and get ready for Gencon.
Friday, May 8, 2009
No 'games' to report
Okay, so another month goes by with little actual gaming occurring. The big issue is that I do find time to play games; every Thursday I go to the local game store to play either Warmachine/Hordes or MonPoc. Warmachine was in the mk2 playtest for April which was very exciting! It changes a lot of what has come before, but I find myself wanting to play games with the new set. It's a nice change.
I'm still working on the both the starmada and SBH scenarios for Origins. I have to make sure that I have enough stuff for a decent game, but not alot in terms of packages. I don't want to have to drive myself so I would really like to limit it to a case or so.
My current project is making the room monsters and the assorted accesories located in the dungeon. I am in the process of taking a bunch of my old mage knight miniatures and rebasing them for the game. Hopefully, I'll have that done in the next few days and I can begin to playtest what I got...
Friday, April 10, 2009
The Dungeon - SBH
Since I am going to be running a dungeon crawl for 6 players at Origins using the Song of Blades and Heroes rule set, I need to work out how I wanted the game to flow for the event. The first test was to figure out what sizes or rooms and corridors that I'll need to make the game fun and challenging. Although I would love to have a huge 3D dungeon for the event, I just won’t have the needed place to carry and store it.
So, a while ago I picked up the game Dungeon Bash from The Other Game Company (TOGC) and while cleaning my gaming area found the tiles that I had made for that game. I figured that I’d use those as a starting point and move from there. The Dungeon Bash rules also have a random dungeon generator so I figured that I could use that to create my dungeon. The tiles are your standard D&D variety. All corridors are 2 squares (read inches here) wide with two room sizes - small (4 by 6) and large (6 by 8).
So, a while ago I picked up the game Dungeon Bash from The Other Game Company (TOGC) and while cleaning my gaming area found the tiles that I had made for that game. I figured that I’d use those as a starting point and move from there. The Dungeon Bash rules also have a random dungeon generator so I figured that I could use that to create my dungeon. The tiles are your standard D&D variety. All corridors are 2 squares (read inches here) wide with two room sizes - small (4 by 6) and large (6 by 8).
Due to the ability for players to bring their own warbands to the event, I need to have a warband that comes completely from the printed rosters to test out my ideas than the one I normally play. Looking over the rules for dungeons, I came up with the following:
1x Elf Archer (55pts)
2x Dwarf Elite Warrior (46pts apiece)
1x Human Warrior (30pts)
1x Halfling Thief (16pts)1x human Mage (40pts)
1x Human Leader (60pts)
Total: 293 pts with 100 pts of personalities
I'll eventually need to create 6 warbands for the game so I'm not sure if I like the multiple race types in this one. Only more playtesting (and seeing what model I actually have) will determine this. I also want to limit the number of figures in the warbands that I create (although 7 isn’t a bad starting point).
A couple of rule tests:
1. Each player (and monsters) will be given a card to determine the turn order for that round. I think that will be the easiest and give some randomness to the turn order. I haven’t decided how to move the enemies in the event yet since the rules for failures.
A couple of rule tests:
1. Each player (and monsters) will be given a card to determine the turn order for that round. I think that will be the easiest and give some randomness to the turn order. I haven’t decided how to move the enemies in the event yet since the rules for failures.
2. At the end of the player’s turn, they will check for wandering monsters by rolling 2 dice. If doubles are rolled and it is equal or greater to that player’s wandering monster number (WMN), a wandering monster group will be placed in some cool fashion. A player’s WMN starts at 6 and will lower by one each turn it is unsuccessful.
3. Normally monsters will not have enough treasure on them to matter, but after each monster killed, 2 dice are rolled. On doubles, a number of treasure cards will be drawn determining the worth of the stash. Some especially powerful creatures will add a die to this roll (still looking for doubles).
4. Each character may carry a single treasure load without penalty. Big creatures can carry 2 and huge can carry 4 without penalty.
For the game, the normal sized creature group was about 100 points and the wandering monster groups were either 2 orc warriors (1-2), two orc archers (3-4) or one of each (5-6). The ‘quest’ room was around 150 points.
Note: the first of the two numbers for the combat results is the die roll.

The 'start' room with the Heroes all inside.
Turn 1 and 2: Heroes start to move up to the closest door. Both corridors are long and complaex (I rolled really high for both).
Turn 3: My human warrior end her turn next to the door finding a large room with 4 orcs and a single treasure (I was places a treasure horde on a 5+, but I might change how this works)! The mage casts transfix at the closest warrior and successes. One of the elite dwarf warriors moves into the doorway. I also rolled double 5 for the wandering monster roll (WMR) and 2 orc warriors appeared down a second hallway. Both orc Archers activate and shoot at the dwarf with nothing happening (3+3 v 5+4 and 1+3 v 4+4).

The heroes are being flanked as most are doing battle in the large room.
Turn 4: My elf archer moves and attacks but doesn’t manage to score a hit (2+3 v 6+3). The dwarf move father into the room to attack pushing his opponent back (5+4 v 5+3).The human warrior moves in and knocks an orc warrior down (2+3 c 1+3). The Mage casts bolt at the transfix model, but the effect doesn’t seem to do any harm (1+4 v 6+3). No wandering monsters (needed to roll double 6s). The orc archers shoot at the halfling and the elite dwarf warrior but nothing happens (2+1 v 5+1 and 4+3 v 5+3). The orc warrior shakes off the spell and attacks but is knocked down by the dwarf (3+3 v 4+4).
Turn 5: The leader moves to engage the orc while the human warrior power attacks the fallen warrior scoring a gruesome kill (4+5 v 2+2). One the orc archer runs to the door and opens it and the other archer runs off the explored area.
Playtest thought: I determined that the next wandering monster would include any model that fled from a battle. This won’t be an issue when the complete dungeon will be set up for the event.
The elf archer attacks the warrior but merely pushes it back (5+3 v 5+1). Both of the dwarves move with the second one making an attack. Due to the door instead of being fallen, the model falls (1+4 v 3+1)! Still no wandering monsters.
Playtest note: Since the door was ‘opened’ by the archer, perhaps he should have just been placed one base width through the door.
The Orc warrior attacks the human leader killing him (6+3 v 2+2). The elf human warrior and mage flee 1 move (It should have only been the elf since no other characters could see the leader, but I was messing up how the +1 Quality for the leader was working so it kind of balances out – I’ll know next time).
Turn 6: The mage transfixes the orc warrior and the elf archer aims and finishes it off (3+5 v 1+2).One of the dwarves power attacks the orc archer killing him (4+4 v 3+1) while the second dwarf picks up the treasure. The orc warrior pushes his target (4+3 v 5+3)
Turn 7: The elf archer moves up and power attacks the warrior knocking to the ground (6+3 v 4+1), but the orc warrior stand and attacks and pushes the human warrior back (5+3 v 3+2).
Turn 8: Heroes surround the final orc and a dwarf gruesomely finishes it off (6+3 v 2+0).
Turn 9: Heroes discover a small room with a mummy and two skeletal archers (no treasure). Both skeletal archers attack the human warrior – the first manages to knock her down, but the second can’t kill her off (4+1 v 1+3 and 5+1 v 6+2). The mummy (the reaper model) moves next to the fallen human warrior who tries to flee but is killed instead.

The human warrior must have found an old crypt.
Turn 10: The elf aims at the mummy and hits it with a lethal shot (6+1 v 1+2) making its quality 6+. There are still no random monsters (my WMN is now a 1). The skeletal archer fails two dice and that round ends.

A clean shot from the elf archer strikes the mummy wounding it!
Turn 11: The elf archer rolls three 1s ending the hero’s turn. I also roll doubles and 3 orc archers appear. One of the orc archers attacks the Halfling knocking him to the ground (5+1 v 3+1 – normally a push back, but can’t due to the fact that there is a model in the way).
There were a couple more turns (4 to be exact), but most of them were spent attacking the mummy in the doorway and the orc archers that appeared in a separate corridor. At this point, I had ran out of time to play so I decided to roll up the whole dungeon to see what it looks like once complete. I stupidly didn’t keep track of the amount of time played so that will have to be in the second test. All in all, it was a good playtest. I have some ideas for the set up and the like that I’ll need to get finished as soon as possible so I can try them out. I have about 2 months to finish everything.

As you can see, it was a big dungeon complex. I wonder how long it would have taken to actually 'explore'.
Tuesday, March 10, 2009
Friday Night Fights - special Tuesday edition
Someone (named "aroninphilosopher") on the THW boards has been talking about his fights which prompted me to dust off my copy of Friday Night Fights (special Tuesday edition I guess). The game is pretty entertaining and there is a bit of strategy so it works in all respects. Plus, I didn’t have to clean up the last game since it doesn’t take up too much room. It didn’t take long to get back into the ‘swing’ of things (best pun ever).
As before, the challenger is Jacob “Mac” McGrath, a 5’8” 162 lb Middleweight with decent boxing skills (level 4) and is fairly aggressive (level 3), but his real advantage is his Quick Reflexes. [Taken directly from the Promo sheet]
Jacob has been working hard and has managed to increase his power which should help him when he gets a chance to go in for the KO punch!
Since the first five bouts can be 4 rounds, we’ll have a short one before the big times. Randel West comes in as a decent boxer which great stamina. Can the challenger take him down!
Unlike last time, I didn’t do a round by round write up. It was more of a summary of events. Let me know which one is better.

Here is my setup for the fights (Stock photo Courtesy of 12/12/2008).
Round 1: Jacob connects early with a series of punches in the center of the ring until broke up. The round ends with both boxers in the center of the ring and evenly matched.
Round 2: Early in the round, another flurry of punches by Jacob while Randel is on the ropes. Randel cuts off the ring, but the boxers are evenly match and the round ends.
Round 3: Both are squaring off in the center of the ring, but no one can get the advantage. Late in the round Randel is pushed in to the ropes, but no true victor can be determined.
Round 4: Both boxers are putting everything they can in to the fight to win the match, but nothing comes of it in the beginning of the round. Late in the round, Jacob gets put into the ropes, but comes out in an array of punches putting Randel in the corner, looks like Jacob has a chance to put Randel to the canvas, but can’t seal the deal. The referee steps in and the round ends…
Winner by Unanimous Decision, Jacob McGrath (40 to 37)! Crowd goes wild.
This win gains me 1 fame point (up to 13), but a 5 - 0 - 2KOs record. I manage to get a +1 to my quickness. With the quick reflexes, I’m becoming a terror on the Clinch Table.
Now that I have 5 bouts under me, I start moving to the big time arenas. Of course that means that I’ll have to survive 10 rounds. Next up is Stuart “Stu” Smith, an aggressive boxer with good boxing skills, but known for his slippery defense. Will the pressure be too much for the challenger?
Round 1: Stu hits the canvas late in the round, but manages to shake it off.
Round 2: Jacob continues to keep control of the match.
Round 3: Jacob gets Stu to the KO table, but fails to score the knockdown blow! Stu finally scores points.
Round 4: A quick round, but Jacob get a couple solid punches – looks like they’re judge this in his favor.
Round 5: Jacob covers up to get out of the round with minimal work.
Round 6: Jacob pushes Stu to the ropes, but a sudden uppercut catches him unaware! Stu just didn’t have the power behind the punch to knock Jacob to the mat. – Jacob clearly loses his first round (at this point both boxers have 4 Bonus Dice remaining).
Round 7: Jacob puts Stu back on the canvas, but Stu recovers
Round 8: Jacob can’t capitalize on the now tired Stu.
Round 9: Jacob covers up twice after being backed into the ropes (from the stalking table).
Round 10: Jacob and Stu just hammer each other, but no fighter hits the canvas.
Winner by Unanimous Decision, Jacob McGrath (99 to 91)! Another fame point and in a crazy mental moment, I try to increase boxing. I first roll a 1 & 5 which allows me a second chance. The dice come up 5 &5 and I increase boxing to 5! Now 6 - 0 - 2KOs and 14 fame.
The next match is going to be a 10 round match against Tim Withers a boxer not known for his aggression or his speed (slow attribute).
Round 1: Jacob clearly has the advantage with the higher boxing skill against the slower Tim. If Tim doesn’t win the stalking table, he immediately covers up!
Round 2: Time hits the canvas from a strong hook from Jacob, but is only stunned and the match continues.
Round 3: No real excitement as it’s clear that Jacob out classes the slower Tim.
Round 4: Tim punches Jacob into the ropes, but neither boxer can gain ground (on the clinch table)
Round 5 to 7: Tim just can’t seem to get into a favorable position and covers up through most of these rounds, but spending a lot of his reserves in the process (Tim is running quickly out of bonus dice).
Round 8: Tim is in a world of hurt from the beating Jacob is giving him, but Jacob can’t seem to knock Tim to the mat (Tim is in the corner with no boxing dice remaining).
Round 9: Jacob finally knocks Tim to the canvas. The referee calls a TKO!
After the amount of times I’ve made it to the KO table, but can’t get the knockdown, I try to increase my power. I roll a 2 & 4, but my second roll is a 5 & 5 which succeeds!
Jacob McGrath is now 7 – 0 with 3 KOs and 15 fame. He is a very skilled boxer (boxing skill 5) with solid power (level 4) and decent quickness (level 3, but has the quick reflexes attribute); a moderate aggression (level 3) and good stamina (level 4) rounds out his abilities. It looks like he has the ability to go real far!
After playing a couple of full bouts, the game is pretty entertaining. If you are playing solo, the first couple of rounds can make or break you if you can take control of the match. Of course, you use too many bonus dice and you will be hurting once it goes to the middle rounds.
The final match was kind of sad. Jacob would normally win the stalking roll (it’s 8 to 6 dice) so Tim would cover up once it went to the boxing table (5 + 1 for him being slow vs. 4). Most often than not, Tim would be forced into the ropes/corner and Jacob would use him as a punching bag. There was the shot in the 4th that Tim on the ropes was able to win by 3 dice and had a chance to knock Jacob to the mat, but with a power of 1, it just wasn’t meant to be.
Friday, March 6, 2009
Still alive
I know that It's been a while since I posted on this blog. It's not that I have stopped or anything, but the recent couple of weeks have been too cold to make it to the game area. The major problem with a walkout unfinished basement. It's gets pretty darn cold in there if it's cold outside!
Still, I'm working on a couple of games and with Privateer Press talking about not going to Origins, I am working on a different idea to get a free badge. Table Top Gamers (based in Ohio and an awesome bunch of people) are always looking for help and I might bring SBH to Origins for a couple of 2 hour sessions. I'm hoping to have about 4 sessions to learn the rules and a couple of sessions of a four-for all!
Stay tuned...
Tuesday, February 17, 2009
Song of Blades and Heroes - Against the Nephew
So when my Nephews came for a visit this past Friday, the older one (who is 10 and named Dakota) saw that I still had a game set up on my game tables and asked what all parents and uncles want to hear: “Can we play this game?”. Of course, one I set the other nephew (name’s Trace) up on the game cabinet, I started to determine the teams. Once he said something, I figured the easiest to explain and set up in a small amount of time was Song of Blade and Heroes (it was). I have a bunch of figures laying about the tables and start to determine the warbands.
After some cajoling, he decided on the heroes so I took the villains. After looking through my minis and the rule book, I settled for these warbands. I used just the profiles found in the main rulebook so I could explain quickly and get going. We didn’t have much time and I didn’t want to disinterest him…

The Good (297pts)
2x Dwarf Elite Warriors @ 46pts
1x Elf Archer @ 55pts
5x Human Warriors (30pts)
The Bad (294pts)
3x Orc Warriors (23pts)
2x Orc Archers (29pts)
3x Goblin Warriors (15pts)
2x Goblin Archers (21pts)
1x Small Dragon (80pts)
I took the dragon mainly due to the fact that I was running out of green-skins and it fits the needed points perfectly. Besides, I should be able to handle the specials.
After the warbands were determined, I quickly went through the rules and the game was on. I helped him with tactics since I’m sure that he hasn’t done any wargaming, but he picked it up pretty fast and was starting to enjoy himself. The best part of the game was the play by play of the separate battles when the dice were rolled. I wish adults could keep that kind of imagination!
The battle when Grandma called it - It was dinner time (Notice that the dragon is holding its own on the right flank).
After some cajoling, he decided on the heroes so I took the villains. After looking through my minis and the rule book, I settled for these warbands. I used just the profiles found in the main rulebook so I could explain quickly and get going. We didn’t have much time and I didn’t want to disinterest him…
The forces have started to move together!
The Good (297pts)
2x Dwarf Elite Warriors @ 46pts
1x Elf Archer @ 55pts
5x Human Warriors (30pts)
The Bad (294pts)
3x Orc Warriors (23pts)
2x Orc Archers (29pts)
3x Goblin Warriors (15pts)
2x Goblin Archers (21pts)
1x Small Dragon (80pts)
I took the dragon mainly due to the fact that I was running out of green-skins and it fits the needed points perfectly. Besides, I should be able to handle the specials.
After the warbands were determined, I quickly went through the rules and the game was on. I helped him with tactics since I’m sure that he hasn’t done any wargaming, but he picked it up pretty fast and was starting to enjoy himself. The best part of the game was the play by play of the separate battles when the dice were rolled. I wish adults could keep that kind of imagination!

One of the elite dwarves is surrounded, but is managing to stay alive. It doesn't look good for the dragon.
Due to time limitations, we didn’t get the complete game in, but the forces of good were definitely coming out on top. Perhaps, I’m going to have to ask for a rematch when he comes back down!
The battle when Grandma called it - It was dinner time (Notice that the dragon is holding its own on the right flank).
Wednesday, January 14, 2009
Rescue the Priestess - SBH game
Saviors of the Savage Lands – Rescue the Priestess
With the priestess in the hands of the Wolfen, Jareth and his band knew they have but one chance to save the priestess from a grisly fate. With only Pip slightly wounded, they stalk Onyx and his gang back to a heavily forested location and wait for their forces to split up before rushing in to save Verlia.
Everyone in the band was healed except for Pip who was +1 Quality. I don’t have any Fame points and my money is fairly low so I press on with what I got. Hopefully there won’t be any major issues…
Scenario Rules:
I decide that for the rescue that the Wolfen warband is split into two forces. Half are guarding the priestess and the other half off doing ‘something’. I also decided to play with the 400 point Wolfen warband I created in the previous game (see that post for the Wolfen stats). For reinforcements, I’d roll 1d6 at the beginning of Onyx’s turn. If the die roll plus the turn number was 7+, the reinforcements would arrive in the middle of the left or right side of the battlefield and activate normally. In order to free the priestess of her bonds, a single model in base to base contact must take two actions in a single activation. If I can manage to free the priestess and get her off the board without her fleeing or being killed, I’ll receive 50 silver pennies once I get her to the shrine. Models killed before the reinforcements will only grant half their cost for VP purposes (rounded down).
The Wolfen (399 pts)
Guarding force
1x Hunters @ 57 (56 was a typo)
3x Fangs @ 51
Reinforcements
Onyx @ 132
1x Hunter @ 57
Okay, this being my third or fourth game of SBH, I am still learning the strategy for the system. I haven’t played much DBA/DBM so the doubling method isn’t my strong suit. So when I set this game up and play it, I got killed in turn 2! Yep, turn two. I think the entire game (including set up and writing down the action) took 10 minutes TOPS! My problem is that I placed Jareth in front of Erdan and Durgon as a screen and a Fang attacks Jareth knocking him down. I roll 2 dice for Jareth’s activation and I fail both. This passes the turn over to the Wolfen and the Fang in combat with Jareth makes short work of him (6+5 vs 2+4). The resultant leader loss makes two of my models flee off the board (I’m only about 1 long on the field anyway). The 50% warband check results in everyone but Durgon retiring from the field.
So, I do what any person growing up in the computer age does… I press the ‘reset’ button and chalk that up as a learning experience and reset the game to play it over. No one (including myself) wants a 2 turn battle report! For all results below, the die roll is the second number for all combats so "5+4" means that I rolled a 4 adding to the modified combat score of 5.

Turn 1 & 2: The Heroes move up and so do the Wolfen (no reinforcements).
Turn 3: Erdan aims at a Fang and knocks him prone [5+4 v 2+4]. Flashfire engages the lone Hunter. Durgon moves and power attacks the fallen Fang killing it [6+2 v 2+5]. No reinforcements, but the Hunter attacks Flashfire after a Fang moved up to help (I rolled 3 dice, but only got a single success), but the Hunter is knocked prone [4+1 v 4+4]!
Turn 4: Durgon moves and attacks fallen Hunter, but are evenly matched [6+3 v 3+6]! Erdan moves to attack the same Hunter, but manages to kill it [6+6 v 2+5]! Flashfire attacks the Fang and kills him outright [5+5 v 3+2]. The single remaining Fang makes a morale check and moves back a move (50% total warband). The reinforcements arrive on the right side of the board and both begin to move into range.
Turn 5: Erdan and Durgon move to help free the priestess. Onyx attacks Pip knocking the Halfling prone [5+6 v 3+5].
Turn 6: Durgon frees the priestess and the Heroes surround Onyx. Erdan power attacks Onyx, knocking him down [5+6 v 3+3], but the heroes can’t capitalize. Onyx attacks Jareth after a Hunter moved into contact, but they are evenly matched [3+5 v 2+6].
With the priestess in the hands of the Wolfen, Jareth and his band knew they have but one chance to save the priestess from a grisly fate. With only Pip slightly wounded, they stalk Onyx and his gang back to a heavily forested location and wait for their forces to split up before rushing in to save Verlia.
Everyone in the band was healed except for Pip who was +1 Quality. I don’t have any Fame points and my money is fairly low so I press on with what I got. Hopefully there won’t be any major issues…
Scenario Rules:
I decide that for the rescue that the Wolfen warband is split into two forces. Half are guarding the priestess and the other half off doing ‘something’. I also decided to play with the 400 point Wolfen warband I created in the previous game (see that post for the Wolfen stats). For reinforcements, I’d roll 1d6 at the beginning of Onyx’s turn. If the die roll plus the turn number was 7+, the reinforcements would arrive in the middle of the left or right side of the battlefield and activate normally. In order to free the priestess of her bonds, a single model in base to base contact must take two actions in a single activation. If I can manage to free the priestess and get her off the board without her fleeing or being killed, I’ll receive 50 silver pennies once I get her to the shrine. Models killed before the reinforcements will only grant half their cost for VP purposes (rounded down).
The Wolfen (399 pts)
Guarding force
1x Hunters @ 57 (56 was a typo)
3x Fangs @ 51
Reinforcements
Onyx @ 132
1x Hunter @ 57
Okay, this being my third or fourth game of SBH, I am still learning the strategy for the system. I haven’t played much DBA/DBM so the doubling method isn’t my strong suit. So when I set this game up and play it, I got killed in turn 2! Yep, turn two. I think the entire game (including set up and writing down the action) took 10 minutes TOPS! My problem is that I placed Jareth in front of Erdan and Durgon as a screen and a Fang attacks Jareth knocking him down. I roll 2 dice for Jareth’s activation and I fail both. This passes the turn over to the Wolfen and the Fang in combat with Jareth makes short work of him (6+5 vs 2+4). The resultant leader loss makes two of my models flee off the board (I’m only about 1 long on the field anyway). The 50% warband check results in everyone but Durgon retiring from the field.
So, I do what any person growing up in the computer age does… I press the ‘reset’ button and chalk that up as a learning experience and reset the game to play it over. No one (including myself) wants a 2 turn battle report! For all results below, the die roll is the second number for all combats so "5+4" means that I rolled a 4 adding to the modified combat score of 5.
The terrain is set up as a nice wooded area that the Wolfen can get plenty of ambushes if they can manage it.
Turn 1 & 2: The Heroes move up and so do the Wolfen (no reinforcements).
Turn 3: Erdan aims at a Fang and knocks him prone [5+4 v 2+4]. Flashfire engages the lone Hunter. Durgon moves and power attacks the fallen Fang killing it [6+2 v 2+5]. No reinforcements, but the Hunter attacks Flashfire after a Fang moved up to help (I rolled 3 dice, but only got a single success), but the Hunter is knocked prone [4+1 v 4+4]!
Turn 4: Durgon moves and attacks fallen Hunter, but are evenly matched [6+3 v 3+6]! Erdan moves to attack the same Hunter, but manages to kill it [6+6 v 2+5]! Flashfire attacks the Fang and kills him outright [5+5 v 3+2]. The single remaining Fang makes a morale check and moves back a move (50% total warband). The reinforcements arrive on the right side of the board and both begin to move into range.
Turn 5: Erdan and Durgon move to help free the priestess. Onyx attacks Pip knocking the Halfling prone [5+6 v 3+5].
Turn 6: Durgon frees the priestess and the Heroes surround Onyx. Erdan power attacks Onyx, knocking him down [5+6 v 3+3], but the heroes can’t capitalize. Onyx attacks Jareth after a Hunter moved into contact, but they are evenly matched [3+5 v 2+6].

A huge melee occurs. Flashfire must be busy cleaning her claws after the kill (note the new bases)!
Turn 7: Xaria casts a Power 1 transfix at the Hunter and he fails the check becoming transfixed (I rolled a 1). Erdan power attacks Onyx, but they are evenly matched [3+5 v 2+6]. Jareth attacks the transfixed Hunter killing him [4+6 v 3+5], but he ends the turn due to two failures. Fang attacks Erdan but are evenly matched [3+3 v 3+3]. Onyx attacks Jareth, but is knocked down [3+1 v 3+4].
Turn 8: Erdan power attacks Onyx, but again they are evenly matched [5+3 v 2+6]. Then Jareth attacks and Onyx is wounded [5+3 v 3+2], but the turn ends due to two failures. Onyx gets up and attacks Jareth pushing him back [3+5 v 2+3].
Turn 9: Durgon power attacks Fang, but is saved by his heavy armor [4+3 v 3+5]. Xaria casts a power 2 transfix at Onyx, but he shakes off the effects. Jareth attacks Onyx, but is pushed back [3+2 v 3+5]. Erdan power attacks Onyx knocking him to the ground [3+6 v 3+2]. Pip power attacks Onyx, but it knocked prone [5+3 v 3+6]. Pip uses his last action to stand. Onyx attacks Erdan, but again is knocked prone by his actions [4+1 v 2+4]!
Turn 10: Durgon lunges at the Fang pushing him back [4+5 v 2+6]. Both Erdan and Pip attack Onyx wounding him [6+4 v 2+4] and [5+4 v 2+5]. Onyx again tries to hit Jareth, but is knock prone [3+3 v 3+6]!

The final moments of Onyx as he is seriously wounded (at 6+ quality), fallen and surrounded by heroes!
Turn 11: Erdan finally kills Onyx [6+1 v 2+2]. The heroes surround the lone Fang and Durgon moves up and knocks the Fang to the ground [4+2 v 2+2]. Jareth makes the killing stroke ending the game [5+5 v 1+5].
Wrap up: What a difference the reset made. I think I’m starting to figure out the strategy - at least a little bit. Of course, good die rolls helped out a ton (the reinforcements coming a bit late and all the fallen results on Onyx when he was attacking). In hindsight, I had an action remaining in turn 2 to engage Erdan with a Fang and I should have done that instead of staying at range or moved so he was outside 1 long. The result would have been the same (Erdan would have been combat 4 to the Fang’s 3), but I probably would have moved Durgon first to help the combat values a bit. A model with tough and hero is a very rough combatant. Even when the model is at a quality 6+, you can’t count them out due to the free success!
I was awarded 50 silver pennies (and 50 fame points) due to freeing the priestess and I gained a whooping 318 VPs. Since all my heroes survived, I have 6 shares so everyone is awarded 5 XP. After paying for upkeep, I have 99 silver pennies remaining. Perhaps I need to make rules on how you can buy magical items and the like in this campaign. Currently, money is only used for upkeep and to purchase Mercs.
XP values after this game:
Jareth: 9
Xaria: 11
Erdan 12
Flashfire: 7
Durgon: 7
Pip: 8
I might spend 10 XP to make Erdan a personality. Then I can buy Hero once I get enough XP, but I’m torn on my own rules. I want ‘personalities’ to be rare which is why you have to spend XP just to become a personality, but I only have 12 XP after 3 games.
Final Thoughts: Now I know that some people would scoff at the reset that I did since I’m playing a campaign. Don’t worry; I feel a little bit dirty about it as well. Once I finished my first turn with Jareth in the lead, I remembered how brutal the Wolfen in combat were. I thought of moving him behind my front line (like what I did in the reset), but decided to just roll with it (see where that got me). So, I still had some time to play and I already had the game set up so I just started over (plus, who would have thought that I would have done so awesome in the second attempt). My second reason for the reset is that I needed a write up for my battle and a two turn game would have been pointless. At least with that much XP, I can start testing the campaign system (even if it is my personal creation). I did roll to see what happened to Jareth just in case I wanted to use the original results (he would have suffered a minor wound being +1 Quality for the next game).
Saturday, January 3, 2009
The Sorcerer's Manor - Savage Worlds
At Origins this year, I picked up the Savage Worlds Explorer’s Edition rule book. I’ve always enjoyed the concept of the system and the book was a reasonable price so I figured what the heck. Unfortunately, I haven’t been able to play any games with it, not even any Savage Worlds Showdown (their miniatures game based on their RPG rules).
Fast forward to November of this year when it was announced that Dark City Games was going to release their great solo adventures for the SW system. Imagine the old “Choose Your Own Adventure” books, but for wargaming! I jumped at the chance to purchase Crown of Kings and immediately started to figure out the SW rules and make four novice characters. Recently, the fine people at DCG re-released one of their free sample modules for SW. I couldn’t pass the chance of take a test drive with the rules before jumping into a full module.
My characters are based off the pre-gen characters available from Pinnacle Entertainment Group (PEG), the makers of Savage Worlds:
Merula Lanus [Human]
Agility: d6, Smarts: d8, Spirit: d6, Strength: d4, Vigor: d6
Fighting d4, Investigation d6, Knowledge (Arcana) d8, Spellcasting d8, Notice d6, Persuasion d4, Streetwise d6, Taunt d4
Pace: 6; Parry: 5; Toughness: 5
Hinderances: Curious, Death Wish, Habit
Edges: Arcane Background (Magic), Attractive, Power Points
Powers: Light, Bolt, Defection
Marcus Twohands [Human]
Agility: d8, Smarts: d6, Spirit: d4, Strength: d6, Vigor: d6
Climbing d6, Fighting d8, Lockpicking d6, Notice d4, Stealth d8, Streetwise d4, Throwing d8
Pace: 6; Parry: 6; Toughness: 6
Hinderances: Greedy, Overconfident, Outsider
Edges: Ambidextrous, Thief, Two Fisted
Janine Blackhair [Human]
Agility: d6, Smarts: d6, Spirit: d4, Strength: d8, Vigor: d10
Fighting d10, Gambling d6, Intimidation d6, Notice d6, Taunt d6, Throwing d4
Pace: 6; Parry: 7; Toughness: 8 (2)
Hinderances: Bad Luck, Outsider, Pacifist (Mi)
Edges: Berserk, Trademark Weapon (Battle Axe)
Ramel Ramelson [ Dwarf]
Agility: d6, Smarts: d6, Spirit: d8, Strength: d4, Vigor: d6
Faith d8, Fighting d6, Healing d6, Intimidation d6, Notice d6,Persuasion d6, Streetwise d4
Pace: 6; Parry: 6 (1); Toughness: 7 (2)
Hinderances: Arrogant, Big Mouth, Loyal
Edges: Arcane Background (Miracles), Power Points, Low Light Vision
Powers: Boost/Lower Trait, Healing

Since this is a downloadable programmed adventure, I don’t want to spoil any of the fun if someone wants to check it out and play it. For that reason, I will only give some of the highlights!
Against a living statue: Ramel gets a second joker (two in a row) and hits. Both damage dice Ace (An ace is when a die rolls the maximum number – in Ramel case two sixes. Any die that aces is rerolled and the amount is added to the final total) and the resulting damage amount is 19 well enough to crumble the statue.
Against Spiders: Ramel critically fails a vigor roll for poison. I state that it doubles the potency of the poison. Ramel, his body wracked in pain scores a might hit and scores a killing blow (I aced a damage roll). Then Merula moves up and attacks a spider and amazingly hits doing an unheard of 15 points of damage killing the spider.
Against the shadows: Janine rears back with her battle axe and crushes the shadow with a 26 damage points enough for 5 wounds (If you equal the toughness of a model, you score a ‘shaken’ result. For every 4 over the toughness is a wound. Most models have only 1 wound. Wild Cards (like all of my characters) have 4 wounds. The toughness of the shadow is 6, so 6-9: shaken, 10-13: 1 wound, 14-17: 2 wounds and so on). Since the shadow was a wild card, this was an amazing help!

Fast forward to November of this year when it was announced that Dark City Games was going to release their great solo adventures for the SW system. Imagine the old “Choose Your Own Adventure” books, but for wargaming! I jumped at the chance to purchase Crown of Kings and immediately started to figure out the SW rules and make four novice characters. Recently, the fine people at DCG re-released one of their free sample modules for SW. I couldn’t pass the chance of take a test drive with the rules before jumping into a full module.
My characters are based off the pre-gen characters available from Pinnacle Entertainment Group (PEG), the makers of Savage Worlds:
Merula Lanus [Human]
Agility: d6, Smarts: d8, Spirit: d6, Strength: d4, Vigor: d6
Fighting d4, Investigation d6, Knowledge (Arcana) d8, Spellcasting d8, Notice d6, Persuasion d4, Streetwise d6, Taunt d4
Pace: 6; Parry: 5; Toughness: 5
Hinderances: Curious, Death Wish, Habit
Edges: Arcane Background (Magic), Attractive, Power Points
Powers: Light, Bolt, Defection
Marcus Twohands [Human]
Agility: d8, Smarts: d6, Spirit: d4, Strength: d6, Vigor: d6
Climbing d6, Fighting d8, Lockpicking d6, Notice d4, Stealth d8, Streetwise d4, Throwing d8
Pace: 6; Parry: 6; Toughness: 6
Hinderances: Greedy, Overconfident, Outsider
Edges: Ambidextrous, Thief, Two Fisted
Janine Blackhair [Human]
Agility: d6, Smarts: d6, Spirit: d4, Strength: d8, Vigor: d10
Fighting d10, Gambling d6, Intimidation d6, Notice d6, Taunt d6, Throwing d4
Pace: 6; Parry: 7; Toughness: 8 (2)
Hinderances: Bad Luck, Outsider, Pacifist (Mi)
Edges: Berserk, Trademark Weapon (Battle Axe)
Ramel Ramelson [ Dwarf]
Agility: d6, Smarts: d6, Spirit: d8, Strength: d4, Vigor: d6
Faith d8, Fighting d6, Healing d6, Intimidation d6, Notice d6,Persuasion d6, Streetwise d4
Pace: 6; Parry: 6 (1); Toughness: 7 (2)
Hinderances: Arrogant, Big Mouth, Loyal
Edges: Arcane Background (Miracles), Power Points, Low Light Vision
Powers: Boost/Lower Trait, Healing
Here is my set up. I bought a plexiglass sheet so I can write notes if needed.
Since this is a downloadable programmed adventure, I don’t want to spoil any of the fun if someone wants to check it out and play it. For that reason, I will only give some of the highlights!
Against a living statue: Ramel gets a second joker (two in a row) and hits. Both damage dice Ace (An ace is when a die rolls the maximum number – in Ramel case two sixes. Any die that aces is rerolled and the amount is added to the final total) and the resulting damage amount is 19 well enough to crumble the statue.
Against Spiders: Ramel critically fails a vigor roll for poison. I state that it doubles the potency of the poison. Ramel, his body wracked in pain scores a might hit and scores a killing blow (I aced a damage roll). Then Merula moves up and attacks a spider and amazingly hits doing an unheard of 15 points of damage killing the spider.
Against the shadows: Janine rears back with her battle axe and crushes the shadow with a 26 damage points enough for 5 wounds (If you equal the toughness of a model, you score a ‘shaken’ result. For every 4 over the toughness is a wound. Most models have only 1 wound. Wild Cards (like all of my characters) have 4 wounds. The toughness of the shadow is 6, so 6-9: shaken, 10-13: 1 wound, 14-17: 2 wounds and so on). Since the shadow was a wild card, this was an amazing help!
Here's a shot after the final battle before the characters make their way out of the manor. Notice all the notes scribbled about including the map, turn counters and the shadows damage.
All in all, it was a great time. I really like the Savage Worlds system and it really makes the Dark City Games really shine! The only issue is that it’s a 'long' adventure. This sample game took about 6 hours to play from start to finish. I hope that the actual adventure will be faster since I'm more confident on the rules and the like.
Subscribe to:
Posts (Atom)