Showing posts with label How-to. Show all posts

Sunday, August 1, 2010

Gladiator Arena!

There have been a lot of people playing Red Sands, Blue Sky (RSBS) on the THW forum so I went ahead and bought the game while at Origins. After reading through the rules, it occurred to me that I was going to need a suitable gladiator arena for my combats. In a bit of inspiration, I realized that if I could find a decently sized pizza pan, that I could have a quick (and cheap) gladiator arena! A trip to Walmart netted me a 16” metal pizza pan for a mere 4 bucks.


I scuffed it up with some sandpaper and placed felt on the bottom to keep it for sliding (yellow was on sale).


Then, I glued down a mix of sand and rocks (I find that the best time to get my 'perfect' rock mix is to get some from roads during winter - my city uses sand instead of salt for the roads).


Next step was to spray painted the whole thing brown (I use the cheap spray paint for terrain. I think the can cost about 2 bucks).


A couple of lighter browns and a few tan colors later, I had a nice effect. Clear coated it with cheap matte spray and was ready to play! I found out later that the pizza pan that I bought is metallic and I can add terrain to the arena with a couple of strong magnets (talk about convenient)!

Monday, July 6, 2009

The Great Mage Knight Conversion

Half way through working through my idea for the Murky Caves (my Origin’s game for SBH), I knew that I was going to need a bunch more miniatures if I was going to have enough to run the dungeon as I wanted. I had bought a bunch of D&D singles (pre painted plastic miniatures), but it was just not going to be enough. After determining exactly how much I had spent on stuff, I remembered that I had a lot of old Mage Knight figures that hadn’t seen the light of day for a while.

Preparing the Figures

I needed to get the miniatures off click base. There were two main reasons for this. First the base is 1.5” around which was too big for my purposes (most of my stuff is on a 1” base) and second, I had to hide the click nature of the miniature.

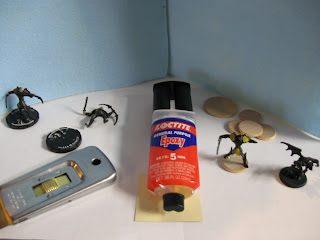
1. I found the best tool for the job is a razor blade scraper (used to remove paint and such from glass). Carefully slide the blade under the miniature until it pops off. Some were relatively easy and some took a little work.

2. I found a great deal on wooden disks online somewhere so I wanted to use them. The only major problem is that superglue won’t attach a miniature to the disk. In the end, I used a two-part epoxy and it worked great. Remember that the fumes that are produced are dangerous – have decent ventilation! As you can see I have two wooden disk sizes available a normal 1” disk and a larger 1.5” disk.

3. After the epoxy dries (mine only took about 10 minutes), paint the base black. This is mainly due to the fact that all my D&D miniatures are a simple black base and they fit right in.


(From Left to right: a starting MK figure, the scraper used, the same model off the base, the epoxy I used, the wooden disks, a model on a disk and the figure on the black painted base)

I hope to go back and repaint some of the MK figures. Most of my come of the earlier sets and the paint job is really bad. Hokey in some respects! I’d also like to finish the bases on some of them to make then stand out less, but it’s definitely not a priority.

(You can see the number of empty bases from the now converted figures)

Most of my MK collection is from the dungeons series that came out. I have the whole line of heroes that I should go ahead and convert as well. More so now since I really don’t have enough of playable mage knight figures!

Friday, November 28, 2008

Gaming Table


As you can see in this picture, we (my dad and myself) are working on making a gaming table. Two actually, since the construction of a second one wasn't going to be all that different from the first. I was going to have them at gut height while standing, but in the end went with about normal table height off the ground. So with a single piece of 4x8' plywood and a few 2x4 boards I will have 2 4x4' gaming tables. As you can see, the first table is taking shape.


I'll spare you with the complete how-to guide as there are enough of those already on the internet. Once at the completed stage (at least building wise) it was time to stain them. At the right, you can see the drop cloth under the table ready for the staining.