In an effort to ensure that I meet one of my missions this year, I am planning this early so I can have a lot of time to finish it. Since I have a new army, I figured that I would go with the Retribution for my choice (I really should paint pirates, but I'm scared of the number of solos)!
35 Points:
Ravyn, Eternal Light (*6pts)
* Griffon (4pts)
* Phoenix (10pts)
Dawnguard Invictors (Leader and 9 Grunts) (10pts)
* Dawnguard Invictor Officer & Standard (2pts)
House Shyeel Battle Mages (Leader and 5 Grunts) (5pts)
Arcanist (1pts)
Eiryss, Mage Hunter of Ios (3pts)
Ghost Sniper (2pts)
Ghost Sniper (2pts)
House Shyeel Magister (2pts)
First mission is that I'm going to need to purchase two Ghost Sniper models (not really an issue - I need them for the army anyways). Then a paint scheme. I really don't like the official white - that's not true, I don't think I can make te white look cool.. In that end, I'm looking for something different. I really want to do Black/Orange, but I don't think painting-wise I can pull it off.
Saturday, March 6, 2010

Tuesday, February 2, 2010
Saving Private Ryan - the Return!
The heroes make their way back to Death’s Hill with the evil statue (smaller now due to the loss of Flashfire).
The first two turns go without much incident. The statue creates a guard on each turn and the heroes move up slowly (The three slow moving models are now in a group and are being ‘commanded’ by Jareth).
On the third turn, the statue fails to create a guard even with a hero reroll. Most of the heroes again move forward, but Xaria casts a 3 power transfix which does nothing and Erdan shoots, but does nothing.
On the fourth turn, the statue creates a guard, but uses the final hero reroll in the process. Xaria casts a magical bolt and Erdan shoots, but again nothing happens.
 See what strategy can do for the game - Go Leaders!
 If I lose one more model, I'll have to take a morale check.
The first two turns go without much incident. The statue creates a guard on each turn and the heroes move up slowly (The three slow moving models are now in a group and are being ‘commanded’ by Jareth).
On the third turn, the statue fails to create a guard even with a hero reroll. Most of the heroes again move forward, but Xaria casts a 3 power transfix which does nothing and Erdan shoots, but does nothing.
On the fourth turn, the statue creates a guard, but uses the final hero reroll in the process. Xaria casts a magical bolt and Erdan shoots, but again nothing happens.
 See what strategy can do for the game - Go Leaders!
On the fifth turn, the statue makes a fourth guard. The slow-moving group has finally made it to the edge of the hilltop. Xaria again tries to transfix and Erdan tries to shoot a guard to no effect (I’m seeing a pattern here).
The sixth turn happens with the statue creating a guard and Jareth failing 2 dice on his activation ending the turn. Thankfully, the seventh turn, the statue does nothing. Pip, Selena and Durgon move onto the hilltop and Xaria fails to cast a spell and the momentum shifts (she failed 2 activation dice).
The eight turn sees the first hero death as Pip falls to his aggressor (the classic 1 against a 6 - 3+1 v 3+6). The statue transfixes Selena. Durgon kills the fallen guard (that Selena knocked down) and Selena shakes off the transfix effect, but little else happens (Xaria casts a low powered bolt, but the guard is unaffected – and ends the turn in the process).
The ninth turn has a guard knock down Selena, but no other guards manage to exploit the opening (I thankfully rolled a lot of ones for the guards) and the statue fails to do anything. Selena stands up while Xaria fails to transfix the nearest guard. Durgon and Erdan climb to the top of the hilltop.
The sixth turn happens with the statue creating a guard and Jareth failing 2 dice on his activation ending the turn. Thankfully, the seventh turn, the statue does nothing. Pip, Selena and Durgon move onto the hilltop and Xaria fails to cast a spell and the momentum shifts (she failed 2 activation dice).
The eight turn sees the first hero death as Pip falls to his aggressor (the classic 1 against a 6 - 3+1 v 3+6). The statue transfixes Selena. Durgon kills the fallen guard (that Selena knocked down) and Selena shakes off the transfix effect, but little else happens (Xaria casts a low powered bolt, but the guard is unaffected – and ends the turn in the process).
The ninth turn has a guard knock down Selena, but no other guards manage to exploit the opening (I thankfully rolled a lot of ones for the guards) and the statue fails to do anything. Selena stands up while Xaria fails to transfix the nearest guard. Durgon and Erdan climb to the top of the hilltop.
 If I lose one more model, I'll have to take a morale check.
Turn 10: Selena is powerfully attacked and is killed (with a second guard in contact and the powerfully attack, it was 0 to 3 in favor of the guard). The guard to attack Durgon rolls snake eyes and the turn ends there for the statue. Durgon kills the guard in combat with him with a powerful attack.
Turn 11: Durgon is attacked twice, but is pushed back and then pushes his second attacker back. The statue tries and fails to entangle Erdan. All heroes are now on the hilltop.
Turn 12: The first guard moves but can’t attack Durgon. The second guard powerfully attacks Durgon, but is knocked down in the process. The Statue fails to make a guard.
Turn 11: Durgon is attacked twice, but is pushed back and then pushes his second attacker back. The statue tries and fails to entangle Erdan. All heroes are now on the hilltop.
Turn 12: The first guard moves but can’t attack Durgon. The second guard powerfully attacks Durgon, but is knocked down in the process. The Statue fails to make a guard.
 If we can get rid of these two guards, we might have a chance!
Erdan kills the fallen guard, but fails to make his terror check and can’t move into melee with the statue (he moves to help Durgon with the last guard instead). Xaria casts a powerful transfix spell at the statue and even with its magic resistance, it fails the roll and is transfixed! Jareth makes his move and attacks the transfixed statue with a powerful attack but fails to destroy the mighty statue. Durgon knocks down the final guard.
Turn 13: The guard stands but does nothing else while the statue remains transfixed. Erdan knocks down the guard again and this time can move into melee with the statue. Durgon kills the final guard and moves into melee with the statue. Jareth again tries to defeat the statue, but fails.
Turn 14: The statue fails to recover from the spell and Durgon destroys the statue with a powerfully attacks (6+3 v 5+3).
Injuries:
Pip: Serious Injury
Selena: Full recovery
I get 30 gold for winning the scenario! However, the scenario states that I should get 20xp for destroying the statue and 4xp per guard. In the base campaign rules, that would be 40xp. If you include the 8 guards I killed in the first game (can’t believe that I killed that many guards), I should have about 72xp or 144 points to buy characters with – almost three times what I can do with my current funds.
So, to update this scenario to the campaign rules in Song of Deeds and Glory (if I may be so bold), I’m going to state that killing the statue is worth an extra 1d6x5 gold coins and each guard killed is worth a single gold (perhaps there were some precious gems used in the rituals)... With my dice rolls, that’s an extra 30 gold for the second game (If you think about it, my average with 5 guards killed would be (~57.5 gold and a campaign point, close to the purchase power of 40xp). If you add the 8 gold from the guards killed in my first time, I have a total of 83 gold.
In searching the surrounding lands, we stumbled upon an old alehouse which we manage to cut a deal with the proprietor and will always have a stock of ale if we need it. Durgon all shook up about the loss of Flashfire and injured forgot about the ale we found, but decides to learn the trade from the current brewmaster and is making some pretty good ale (added the special Brewmaster to Durgon).
With my stash of gold I recruit a human warrior (Q3+ C3) for 30 gold and a human barbarian (Q3+ C3 – Fearless, Giant Slayer) for 42 gold which leaves me with 11 gold. With the campaign point, I purchase “Retaining the Initiative”.
The experience: This scenario is still fun and worth a second go. First of all, I rolled a lot better this time. There weren’t as many turnovers as in the first game and I think that was in part me remembering to use a group move for the slower lower quality characters. I had to take a chance with my heroes when I first went on the hill and I paid the price really early. Losing two characters so quickly made me pretty worried about the ending (lethal against personalities is scary, but really makes this scenario shine). With only 4 members left another death would have been a morale check and we saw what that could do. In the end, casting a transfix spell on the statue was what really won the day.
Sunday, January 31, 2010
Song of Saving Private Ryan - Game 1
I located a four scenario campaign called Song of Saving Private Ryan by Aleksandar Saranac for the Song of Blades and Heroes rule set. It turns out that it is to be played solo (the rules have how the enemy warband is to be played). I decided to go ahead and try the first scenario since I hadn’t heard of anyone trying the games from the yahoo group. To that end, I worked a new warband using my knowledge of a couple games and my idea to play them in the new campaign system (found in Song of Deeds and Glory). Before I pass judgment on the campaign rules, I wanted to try them out a couple of times.
 You know things aren't going to end well when you can roll a die cocked without anything in the way!
Here are the new Saviors of the Savage Lands:
Jareth - Personality (60)
Quality 3+, Combat 3
Special Rules: Leader
Xaria - Personality (38)
Quality 4+, Combat 2
Special Rules: Magic-User
Erdan (50)
Quality 3+, Combat 3
Special Rules: Forester, Shooter: Long
Flashfire (56)
Quality 4+, Combat 3
Special Rules: Animal, Blast, Flying
Durgon (50)
Quality 3+, Combat 4
Special Rules: Fearless, Heavy Armor, Short Move
Pip (23)
Quality 4+, Combat 2
Special Rules: Free Disengage, Shooter: Short, Short Move, Stealth
Selena (23)
Quality 4+, Combat 3
Special Rules: Free Disengage, Short Move
Warband changes: The first major change is the addition of a seventh member. Due to the fact that in the campaign rules your starting number of models determines the maximum number allowed, I wanted to add an extra character. I’ve also noticed that a ‘horde’ of models is not necessarily a bad thing either when trying to gang up on someone. This allows me to have 14 models if I ever get that big. Of course that means that Erdan had to lose a point of combat and Pip lost both a combat and a quality to make room. The biggest change is to Flashfire having to rework the specials and combat around to get a better quality. It remains to be seen if Blast is worth the points.
Changes to the scenario one: I couldn’t find anything to use as the flat hilltop that was suitable so I changed the hilltop to be 12x12 inch (30x30 cm). This allowed me to use a piece of cork laying about the basement. Other than that, I went ahead and played the scenario as written.
One thing I noticed is that I have very little in terms of ‘trash’ terrain: rubble, boulders, hedges, trees and the like. Perhaps that should be my winter month mission since it is barely 60 degrees in the basement at the moment.
Turn 1: The Statue rolls two successes and creates a skeletal guard. All is looking good until Flashfire fails 2 activation dice and the two Halflings don’t get to go!
Turn 2: Statue creates a second guard. Both guard hold position. The uphill climb is taking its toll on the heroes, especially those with short moves! Flashfire (not surprisingly) rolls three ones for activation and stays put.
Turn 3: Statue fails to create a guard (failing on the reroll as well). Erdan aims and fires at a Guard with no effect (1+2 v 2+3), Durgon moves slowly up and Pip fails to activate enough to move (passes the turn in the process).
Turn 4: Statue creates a third guard and all guards hold position. Jareth fails to activate on snake eyes! The two halflings are lagging behing the rest of the group
Turn 5: Statue creates a fourth guard. Selena fails to active enough to move which causes a turnover.
Turn 6: Statue creates a fifth guard (using its last hero reroll). All heroes move closer except for Erdan (turnover on Xaria’s turn).
Turn 7: Statue gets two successes and creates a sixth guard. There are heroes within a long band of it so there is a chance that it will try to entangle if it gets three successes on its activation. Erdan aims and fires at a Guard but again with no effect (1+3 v 2+6). Xaria casts a magical bolt at a guard (1+2 v 3+2), but the guard shrugs off the attack. Durgon finally makes on the hilltop and Flashfire blasts into two guards with no damage (3+4 v 3+5 v 3+6). Pip moves closer, but Selena stays put.
Turn 8: Two guards move and attack Flashfire and both are knocked down for their trouble (3+4 v 3+2 and 2+6 v 3+4), but the third guard manages to kill Flashfire (1+3 v 3+5). A guard moves to attack Durgon, but is pushed back (4+5 v 3+5). The statue has nothing within entangle range so creates another guard! Erdan moves into melee with a fallen guard causing a gruesome kill (5+6 v 2+1), but all the undead are a high enough quality that all morale checks automatically pass... Durgon pushes his opponent back with a powerful attack (4+5 v 2+4). Xaria casts a magical bolt at the other fallen guard but doesn’t kill it (0+5 v 3+3).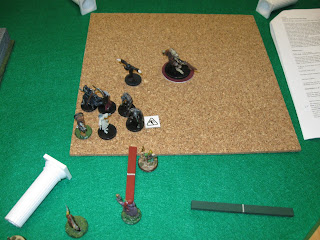
Turn 9: The fallen guard stands and moves into melee with Erdan. A guard moves and attacks Durgon but is knocked down (4+6 v 3+5). A second guard moves in and attacks (3+ 3 v 3+3 ), followed by a third guard who attacks (2+2 v 3+3) and pushes Durgon back! Durgon moves back into melee and kills the fallen guard (6+ 3 v 3+5). Erdan gets pushed back from his attack on a guard (3+2 v 2+5). Xaria tries to transfix one of the guards, but it manages to shrug off the spell (3 powered spell, but no 1s rolled).
Turn 10: Durgon is attacked by a guard (4+3 v 3+2) and pushes it back. A second guard attacks but both are evenly matched (4+1 v 3+2) followed by a third guard that attacks (3+3 v 3+4), but his heavy armor saves him! The statue fails to do anything. Durgon gets a single success (out of three mind you) and does nothing. The turn passes.
Turn 11: Both guards powerfully attack Durgon, but nothing happens (2+6 v 3+5 and 2+5 v 3+4) and the statue still does nothing. Xaria transfixes a guard (another 3 point spell that a guard fails), but Erdan fails to kill it (5+1 v 2+6). Durgon kills one of the guards attacking him (3+5 v 2+2). Both Pip and Selena move closer to the action and Selena tries a shot, but it is highly ineffective (-2+4 v 3+6).
Turn 12: The transfixed guard can’t shake off the effects, but a guard finally manages to kill Durgon (3+1 v 3+6). The statue finally creates a new guard. Erdan again tries to kill the transfixed guard but fails again (5+2 v 2+5). Xaria tries to transfix another guard, but moves a bit forward instead (the turn switches however).
Turn 13: The transfixed guard shakes off the effect and the statue creates a new guard. Erdan pushes the warrior back (3+5 v 3+3) and Xaria casts a low power transfix spell, it manages to work on a guard (rolled a single power spell and it works, but at the cost of the turn).
Turn 14: A guard moves and attacks Erdan, but is killed in the process (3+6 v 3+1), but another guard takes his place. The transfixed guard is still transfixed, but the statue finally can cast a entangle spell powerful enough to hit Erdan who fails the check!
 The heroes are slowly losing their numbers and their foothold on the hilltop.

Turn 22: Erdan is attacked by all three guards. The first moves and is knocked down (3+2 v 3+1), the second is also knocked down (2v6 v 3+3) and the third is pushed back (1+5 v 3+1). Erdan attacks but doesn’t kill a guard (4+1 v 2+5). Xaria inches closer, but again the game shifts.
Turn 23: Erdan is knocked down (2+5 v 3+6) by the first guard and is gruesomely killed by the third guard (1+4 v 5+5). The two resulting morale checks have the remaining heroes flee off the board.
Injuries:
Durgon: Moderate Injury
Erdan: Full Recovery
Flashfire: Dead
Pip: Full Recovery
I manage to find 15 gold. At least all remaining characters gain an experience point. I also explore the countryside about Death’s Hill (and it is now being referred to) and find a lone keg (Durgon is quite happy).
The experience: I really liked this scenario. It was quite fun and was really tense throughout the game. I’m amazed at how many turnovers I had. I know that I should expect a couple throughout the game, but there were a couple times that it was just crazy! When most of my warband fled, I should have had Erdan also move back, but I was really getting tired since in the end, him being unsupported killed him (gruesomely I might add). Thankfully a gruesome kill doesn’t automatically kill a character in the campaign or I’d be done for (or if it does, I can’t find it).
 You know things aren't going to end well when you can roll a die cocked without anything in the way!
Here are the new Saviors of the Savage Lands:
Jareth - Personality (60)
Quality 3+, Combat 3
Special Rules: Leader
Xaria - Personality (38)
Quality 4+, Combat 2
Special Rules: Magic-User
Erdan (50)
Quality 3+, Combat 3
Special Rules: Forester, Shooter: Long
Flashfire (56)
Quality 4+, Combat 3
Special Rules: Animal, Blast, Flying
Durgon (50)
Quality 3+, Combat 4
Special Rules: Fearless, Heavy Armor, Short Move
Pip (23)
Quality 4+, Combat 2
Special Rules: Free Disengage, Shooter: Short, Short Move, Stealth
Selena (23)
Quality 4+, Combat 3
Special Rules: Free Disengage, Short Move
Warband changes: The first major change is the addition of a seventh member. Due to the fact that in the campaign rules your starting number of models determines the maximum number allowed, I wanted to add an extra character. I’ve also noticed that a ‘horde’ of models is not necessarily a bad thing either when trying to gang up on someone. This allows me to have 14 models if I ever get that big. Of course that means that Erdan had to lose a point of combat and Pip lost both a combat and a quality to make room. The biggest change is to Flashfire having to rework the specials and combat around to get a better quality. It remains to be seen if Blast is worth the points.
Changes to the scenario one: I couldn’t find anything to use as the flat hilltop that was suitable so I changed the hilltop to be 12x12 inch (30x30 cm). This allowed me to use a piece of cork laying about the basement. Other than that, I went ahead and played the scenario as written.
One thing I noticed is that I have very little in terms of ‘trash’ terrain: rubble, boulders, hedges, trees and the like. Perhaps that should be my winter month mission since it is barely 60 degrees in the basement at the moment.
Turn 1: The Statue rolls two successes and creates a skeletal guard. All is looking good until Flashfire fails 2 activation dice and the two Halflings don’t get to go!
Turn 2: Statue creates a second guard. Both guard hold position. The uphill climb is taking its toll on the heroes, especially those with short moves! Flashfire (not surprisingly) rolls three ones for activation and stays put.
Turn 3: Statue fails to create a guard (failing on the reroll as well). Erdan aims and fires at a Guard with no effect (1+2 v 2+3), Durgon moves slowly up and Pip fails to activate enough to move (passes the turn in the process).
Turn 4: Statue creates a third guard and all guards hold position. Jareth fails to activate on snake eyes!
 The two halflings are lagging behing the rest of the group
 Turn 5: Statue creates a fourth guard. Selena fails to active enough to move which causes a turnover.
Turn 6: Statue creates a fifth guard (using its last hero reroll). All heroes move closer except for Erdan (turnover on Xaria’s turn).
Turn 7: Statue gets two successes and creates a sixth guard. There are heroes within a long band of it so there is a chance that it will try to entangle if it gets three successes on its activation. Erdan aims and fires at a Guard but again with no effect (1+3 v 2+6). Xaria casts a magical bolt at a guard (1+2 v 3+2), but the guard shrugs off the attack. Durgon finally makes on the hilltop and Flashfire blasts into two guards with no damage (3+4 v 3+5 v 3+6). Pip moves closer, but Selena stays put.
Turn 8: Two guards move and attack Flashfire and both are knocked down for their trouble (3+4 v 3+2 and 2+6 v 3+4), but the third guard manages to kill Flashfire (1+3 v 3+5). A guard moves to attack Durgon, but is pushed back (4+5 v 3+5). The statue has nothing within entangle range so creates another guard! Erdan moves into melee with a fallen guard causing a gruesome kill (5+6 v 2+1), but all the undead are a high enough quality that all morale checks automatically pass... Durgon pushes his opponent back with a powerful attack (4+5 v 2+4). Xaria casts a magical bolt at the other fallen guard but doesn’t kill it (0+5 v 3+3).
Durgon is managing to keep alive with overwealming odds. How long can it last?
Turn 9: The fallen guard stands and moves into melee with Erdan. A guard moves and attacks Durgon but is knocked down (4+6 v 3+5). A second guard moves in and attacks (3+ 3 v 3+3 ), followed by a third guard who attacks (2+2 v 3+3) and pushes Durgon back! Durgon moves back into melee and kills the fallen guard (6+ 3 v 3+5). Erdan gets pushed back from his attack on a guard (3+2 v 2+5). Xaria tries to transfix one of the guards, but it manages to shrug off the spell (3 powered spell, but no 1s rolled).
Turn 10: Durgon is attacked by a guard (4+3 v 3+2) and pushes it back. A second guard attacks but both are evenly matched (4+1 v 3+2) followed by a third guard that attacks (3+3 v 3+4), but his heavy armor saves him! The statue fails to do anything. Durgon gets a single success (out of three mind you) and does nothing. The turn passes.
Turn 11: Both guards powerfully attack Durgon, but nothing happens (2+6 v 3+5 and 2+5 v 3+4) and the statue still does nothing. Xaria transfixes a guard (another 3 point spell that a guard fails), but Erdan fails to kill it (5+1 v 2+6). Durgon kills one of the guards attacking him (3+5 v 2+2). Both Pip and Selena move closer to the action and Selena tries a shot, but it is highly ineffective (-2+4 v 3+6).
Turn 12: The transfixed guard can’t shake off the effects, but a guard finally manages to kill Durgon (3+1 v 3+6). The statue finally creates a new guard. Erdan again tries to kill the transfixed guard but fails again (5+2 v 2+5). Xaria tries to transfix another guard, but moves a bit forward instead (the turn switches however).
Turn 13: The transfixed guard shakes off the effect and the statue creates a new guard. Erdan pushes the warrior back (3+5 v 3+3) and Xaria casts a low power transfix spell, it manages to work on a guard (rolled a single power spell and it works, but at the cost of the turn).
Turn 14: A guard moves and attacks Erdan, but is killed in the process (3+6 v 3+1), but another guard takes his place. The transfixed guard is still transfixed, but the statue finally can cast a entangle spell powerful enough to hit Erdan who fails the check!
 The heroes are slowly losing their numbers and their foothold on the hilltop.
Erdan easily shakes off the effect, but does little else. Xaria casts a powerful transfix spell, but the guard resists. Pip finally makes it to the battle and attacks the transfix model, but can’t strike true (5+3 v 3+6). Selena moves up, but she and Jareth do nothing.
Turn 15: In a lucky break (hopefully), the transfixed guard rolls snake eyes ending their turn early! Pip powerfully attacks the transfixed guard killing it (5+4 v 2+4). Erdan also kills a guard with a powerful attack (3+4 v 2+1). Xaria tries a low powered transfix, but fails.
Turn 16: A guard moves and pushes Erdan back (3+4 v 3+5), but the guard that attacked Pip does nothing (3+2 v 3+2). Xaria again transfixes a guard, but Erdan fails to kill it (5+1 v 3+4). Pip knocks down the guard in front of him (3+4 v 2+2) and Jareth moves on the platform killing it due in part of Pip’s ‘distractions’ (5+3 v 2+5)!
Turn 17: The first guard shakes the transfix spell and the second guard moves into melee with Jareth while the statue makes another guard. Erdan attacks, pushing back his foe (3+5 v 1+5) and moves to aid Jareth. Selena fails to activate and causes a turnover (this could be the end)!
Turn 18: The guard attacks Jareth, but is pushed back (2+5 v 2+2). Erdan is pushed back by the other guard (2+4 v 3+5) and the third guard knocks him down (3+5 v 3+6). The statue makes a fourth guard. Erdan stands up and powerfully forces a guard down (3+2 v 2+2). The turn ends with Selena (rolled double 1s).
Turn 19: The guard moves into contact and attacks Erdan but is repelled (2+5 v 3+2). Selena is attacked but strikes her foe down (2+6 v 3+3). The fourth guard moves to an open position against Erdan and knocks him down (2+4 v 3+4). The statue entangles Selena. Erdan gets up, but does nothing else. Selena breaks free of the entangle spell, but gets knocked down by her foe (4+4 v 3+6). Jareth moves against the fallen guard and kills it (5+3 v 2+1). Pip moves to protect Selena and manages to beat back a guard in the process (3+3 v 2+3).
Turn 20: Erdan holds his own against a guard (3+3 v 3+3) and Pip knocked down the first guard, but get knocked down himself by the second guard (3+4 v 3+3 and 2+5 v 3+6). The statue doesn’t do anything. Erdan and the guard exchange blows (3+5 v 2+6) while Pip just gets up (the momentum shifts).
Turn 21 (whew): The fallen guard arises and Pip is gruesomely killed by the other (1+1 v 3+5). Most of the warband flee (Xaria's at the edge of the board). Thankfully, that is not 50% of the warband yet. Erdan is pushed back by the guard (3+2 v 3+5) and the statue does nothing. Erdan moves back and attacks (3+5 v 2+4) pushing the guard back. Xaria moves closer, but the momentum shifts (again).
Turn 15: In a lucky break (hopefully), the transfixed guard rolls snake eyes ending their turn early! Pip powerfully attacks the transfixed guard killing it (5+4 v 2+4). Erdan also kills a guard with a powerful attack (3+4 v 2+1). Xaria tries a low powered transfix, but fails.
Turn 16: A guard moves and pushes Erdan back (3+4 v 3+5), but the guard that attacked Pip does nothing (3+2 v 3+2). Xaria again transfixes a guard, but Erdan fails to kill it (5+1 v 3+4). Pip knocks down the guard in front of him (3+4 v 2+2) and Jareth moves on the platform killing it due in part of Pip’s ‘distractions’ (5+3 v 2+5)!
Turn 17: The first guard shakes the transfix spell and the second guard moves into melee with Jareth while the statue makes another guard. Erdan attacks, pushing back his foe (3+5 v 1+5) and moves to aid Jareth. Selena fails to activate and causes a turnover (this could be the end)!
Turn 18: The guard attacks Jareth, but is pushed back (2+5 v 2+2). Erdan is pushed back by the other guard (2+4 v 3+5) and the third guard knocks him down (3+5 v 3+6). The statue makes a fourth guard. Erdan stands up and powerfully forces a guard down (3+2 v 2+2). The turn ends with Selena (rolled double 1s).
Turn 19: The guard moves into contact and attacks Erdan but is repelled (2+5 v 3+2). Selena is attacked but strikes her foe down (2+6 v 3+3). The fourth guard moves to an open position against Erdan and knocks him down (2+4 v 3+4). The statue entangles Selena. Erdan gets up, but does nothing else. Selena breaks free of the entangle spell, but gets knocked down by her foe (4+4 v 3+6). Jareth moves against the fallen guard and kills it (5+3 v 2+1). Pip moves to protect Selena and manages to beat back a guard in the process (3+3 v 2+3).
Turn 20: Erdan holds his own against a guard (3+3 v 3+3) and Pip knocked down the first guard, but get knocked down himself by the second guard (3+4 v 3+3 and 2+5 v 3+6). The statue doesn’t do anything. Erdan and the guard exchange blows (3+5 v 2+6) while Pip just gets up (the momentum shifts).
Turn 21 (whew): The fallen guard arises and Pip is gruesomely killed by the other (1+1 v 3+5). Most of the warband flee (Xaria's at the edge of the board). Thankfully, that is not 50% of the warband yet. Erdan is pushed back by the guard (3+2 v 3+5) and the statue does nothing. Erdan moves back and attacks (3+5 v 2+4) pushing the guard back. Xaria moves closer, but the momentum shifts (again).

Turn 22: Erdan is attacked by all three guards. The first moves and is knocked down (3+2 v 3+1), the second is also knocked down (2v6 v 3+3) and the third is pushed back (1+5 v 3+1). Erdan attacks but doesn’t kill a guard (4+1 v 2+5). Xaria inches closer, but again the game shifts.
Turn 23: Erdan is knocked down (2+5 v 3+6) by the first guard and is gruesomely killed by the third guard (1+4 v 5+5). The two resulting morale checks have the remaining heroes flee off the board.
Injuries:
Durgon: Moderate Injury
Erdan: Full Recovery
Flashfire: Dead
Pip: Full Recovery
I manage to find 15 gold. At least all remaining characters gain an experience point. I also explore the countryside about Death’s Hill (and it is now being referred to) and find a lone keg (Durgon is quite happy).
The experience: I really liked this scenario. It was quite fun and was really tense throughout the game. I’m amazed at how many turnovers I had. I know that I should expect a couple throughout the game, but there were a couple times that it was just crazy! When most of my warband fled, I should have had Erdan also move back, but I was really getting tired since in the end, him being unsupported killed him (gruesomely I might add). Thankfully a gruesome kill doesn’t automatically kill a character in the campaign or I’d be done for (or if it does, I can’t find it).
Friday, January 15, 2010
2009 Year in review - thoughts for 2010?
I really didn't want to put a 'year in review' in my gaming blog since it seems so cliche. But then again, perhaps it will spark me to get off my butt and get moving on more gaming.
My plan for 2009 was to play two games a month for a total of 24 games. I logged only 10 actual games over 17 messages. It seems like I am way off and that I don't play very many games (which is true), but these numbers don't include all of my Warmachine/Hordes that I played on Thursdays or the Bloodbowl league that started last year (3 wins, 0 losses). Except for a few miniatures, I really didn't paint anything either.
Enough excuses... The simple truth is that I need to formulate a plan and stick to it.
So the 2010 plan
I think I can get to the two games a month so I will try to make my goal be 24 games. Also, I am going to look into getting a couple of genre finished so I can play games in those.
Mission 1: I am starting to get everything I need to play post-modern and modern horror (aka zombies). That means a lot of miniatures to assemble and paint. Honestly I have about 50 zombies that need to be put together and a handful of modern hunters that need some paint. Should be easy!
Mission 2: Space fleets - I have a lot of spaceships about, but I don't have anything really complete. My mission here is to go through the two GZG fleets that I have and redo them (possiblity with a new paint scheme). Then work through fleets of about 1000 - 2000 points in the different iconic Sci-Fi films about for Starmada. I had a lot of fun running the Starmada games at Origins and want to do that again.
Mission 3: Terrain - I have a collection of half finished terrain projects in the collection and I really want to get those done. When I didn't have space or the need, it was different, but I'd like to clean up that part of the basement and finish some terrain
Mission 4: Painting - I have a lot of miniatures that aren't painted. I'm not looking to complete the whole list, but perhaps I should get to painting some of my Warmachine/Hordes stuff. As well as the other things I've bought along the way.
Mission 5: Use or lose - I need to go through my collection of miniatures and clear out stuff that I'm not going to need or play. I have a lot of micro armor still in the boxes that I need to paint or get rid of (perhaps both). I also have a some 15mm stuff that needs to go.
Okay, that's it for now...
My plan for 2009 was to play two games a month for a total of 24 games. I logged only 10 actual games over 17 messages. It seems like I am way off and that I don't play very many games (which is true), but these numbers don't include all of my Warmachine/Hordes that I played on Thursdays or the Bloodbowl league that started last year (3 wins, 0 losses). Except for a few miniatures, I really didn't paint anything either.
Enough excuses... The simple truth is that I need to formulate a plan and stick to it.
So the 2010 plan
I think I can get to the two games a month so I will try to make my goal be 24 games. Also, I am going to look into getting a couple of genre finished so I can play games in those.
Mission 1: I am starting to get everything I need to play post-modern and modern horror (aka zombies). That means a lot of miniatures to assemble and paint. Honestly I have about 50 zombies that need to be put together and a handful of modern hunters that need some paint. Should be easy!
Mission 2: Space fleets - I have a lot of spaceships about, but I don't have anything really complete. My mission here is to go through the two GZG fleets that I have and redo them (possiblity with a new paint scheme). Then work through fleets of about 1000 - 2000 points in the different iconic Sci-Fi films about for Starmada. I had a lot of fun running the Starmada games at Origins and want to do that again.
Mission 3: Terrain - I have a collection of half finished terrain projects in the collection and I really want to get those done. When I didn't have space or the need, it was different, but I'd like to clean up that part of the basement and finish some terrain
Mission 4: Painting - I have a lot of miniatures that aren't painted. I'm not looking to complete the whole list, but perhaps I should get to painting some of my Warmachine/Hordes stuff. As well as the other things I've bought along the way.
Mission 5: Use or lose - I need to go through my collection of miniatures and clear out stuff that I'm not going to need or play. I have a lot of micro armor still in the boxes that I need to paint or get rid of (perhaps both). I also have a some 15mm stuff that needs to go.
Okay, that's it for now...
Wednesday, December 9, 2009
Crown of Kings - Part 3
Not to be outdone by this module, I started the game at the same place after the total party kill of last time. I got a couple of replies from the Dark City Games forum and it looks like I have a new plan for GM bennies. Of course, after a bit of time at the SW forum, I decided that I would try round 3 if the following GM Bennies rule in place (thanks to Marc for his input):
A GM WC will receive 2 bennies as per the normal rules and will use them in the following instances:
1. Use as a soak roll whenever it receives 2 or more wounds.
2. Remove a shaken result if they are in melee and failed their Spirit roll.
If a GM WC does use a benny (not always possible as you can see), the character that caused the WC to use a benny will receive one.
There is talk about giving out a benny after every combat, but I haven’t felt that is necessary yet so I will hold off on that house rule unless I feel that I need it later.
I couldn’t tell you if it was better die rolling or the above rules, but I managed to kill the dragon without any real issues. A couple bennies are spent, but all characters are alive and well. It only took 5 turns to kill the dragon!
Turn 1: Dragon moves in and breathes fire on Marcus and Merula. Merula manages to move out of the way, but Marcus is stunned (shaken). Marcus fails to recover (must be patting out all those flames), but Merula casts deflection on Janine (spending a benny since she rolled a critical failure).
Turn 2: Dragon goes first again hitting Marcus for 2 wounds, but he soaks one. Nothing else really happens.
Turn 3: Janine does a wild attack to the head and manages to wound the dragon, but it was only one and due to the new rules, the dragon does try to soak it. Ramel heals Marcus (and could have healed 4 wounds).
Turn 4: Marcus failed to recover, but spends a benny; Causing a single wound by attacking the head. The dragon continues to not use its bennies. Dragon can only recover from shaken. Janine does another wild attack to the head and hits for a wound again. Now the dragon has 3 wounds, but hasn’t spent a single benny.
Turn 5: Marcus goes first and hits the dragon causing a fourth wound killing it!
It is odd to have the creature die without using any of its bennies. Especially on the last one when ‘it’ knows it will be killed! Had there been a rule that talks about the final blow, the dragon would have failed the soak roll on the first benny spent, but the second one were had worked to avoid the killing stroke. Of course, that gives Marcus 2 bennies (which puts him back at 3). I’m not sure if I like the way that felt, but for now, I’m going to take the win!
Now to the rest of this module…
Okay, I lied; due to the overwhelming success from before, I was curious if I was just having a good day or if it was something else. I decided to play the scenario one more time.
I did have an issue on the first turn; Marcus hits for 2 wounds on the dragon (he got a joker) and the soak roll didn’t stop any wounds. With the above rule, should the WC NPC try again? My thought is no since it doesn’t “exactly” know if that will be the ‘worst’ attack… but this brings the dragon to 3 wounds and could make the battle really quick! I decided to use the second bennies for the soak roll and it healed one wound. The dragon with two wounds, just recovers from shaken. The second turn starts with Janine hitting the dragon for a wound. The dragon now with 3 wounds can barely recover from shaken. Marcus attacks causes a wound and the dragon is unconscious, but the heroes quickly dispatch it.
Yep, two rounds of combat; with Marcus getting a joker on the first turn and all attacks being a wild swing to the head (at least +0 with no other modifiers, both were higher than that), the dragon went down unexpectedly quickly (not a single benny spent).
I decided to go ahead and finish the module and overall it was a lot of fun. If I remember correctly, this module was online for free before they decided to make these available in print and is probably one of the first. Their style, writing and game flow as gotten much better over the years so I’m a bit disappointed that this was there first conversion. Be warned, there are a couple of conversion issues, but nothing that can’t be solved with a little common sense. Well worth the money if you got the time for a solo game. Hopefully Dark City Games will be pursuing this crossover in the future.
A GM WC will receive 2 bennies as per the normal rules and will use them in the following instances:
1. Use as a soak roll whenever it receives 2 or more wounds.
2. Remove a shaken result if they are in melee and failed their Spirit roll.
If a GM WC does use a benny (not always possible as you can see), the character that caused the WC to use a benny will receive one.
There is talk about giving out a benny after every combat, but I haven’t felt that is necessary yet so I will hold off on that house rule unless I feel that I need it later.
I couldn’t tell you if it was better die rolling or the above rules, but I managed to kill the dragon without any real issues. A couple bennies are spent, but all characters are alive and well. It only took 5 turns to kill the dragon!
Turn 1: Dragon moves in and breathes fire on Marcus and Merula. Merula manages to move out of the way, but Marcus is stunned (shaken). Marcus fails to recover (must be patting out all those flames), but Merula casts deflection on Janine (spending a benny since she rolled a critical failure).
Turn 2: Dragon goes first again hitting Marcus for 2 wounds, but he soaks one. Nothing else really happens.
Turn 3: Janine does a wild attack to the head and manages to wound the dragon, but it was only one and due to the new rules, the dragon does try to soak it. Ramel heals Marcus (and could have healed 4 wounds).
Turn 4: Marcus failed to recover, but spends a benny; Causing a single wound by attacking the head. The dragon continues to not use its bennies. Dragon can only recover from shaken. Janine does another wild attack to the head and hits for a wound again. Now the dragon has 3 wounds, but hasn’t spent a single benny.
Turn 5: Marcus goes first and hits the dragon causing a fourth wound killing it!
It is odd to have the creature die without using any of its bennies. Especially on the last one when ‘it’ knows it will be killed! Had there been a rule that talks about the final blow, the dragon would have failed the soak roll on the first benny spent, but the second one were had worked to avoid the killing stroke. Of course, that gives Marcus 2 bennies (which puts him back at 3). I’m not sure if I like the way that felt, but for now, I’m going to take the win!
Now to the rest of this module…
Okay, I lied; due to the overwhelming success from before, I was curious if I was just having a good day or if it was something else. I decided to play the scenario one more time.
I did have an issue on the first turn; Marcus hits for 2 wounds on the dragon (he got a joker) and the soak roll didn’t stop any wounds. With the above rule, should the WC NPC try again? My thought is no since it doesn’t “exactly” know if that will be the ‘worst’ attack… but this brings the dragon to 3 wounds and could make the battle really quick! I decided to use the second bennies for the soak roll and it healed one wound. The dragon with two wounds, just recovers from shaken. The second turn starts with Janine hitting the dragon for a wound. The dragon now with 3 wounds can barely recover from shaken. Marcus attacks causes a wound and the dragon is unconscious, but the heroes quickly dispatch it.
Yep, two rounds of combat; with Marcus getting a joker on the first turn and all attacks being a wild swing to the head (at least +0 with no other modifiers, both were higher than that), the dragon went down unexpectedly quickly (not a single benny spent).
I decided to go ahead and finish the module and overall it was a lot of fun. If I remember correctly, this module was online for free before they decided to make these available in print and is probably one of the first. Their style, writing and game flow as gotten much better over the years so I’m a bit disappointed that this was there first conversion. Be warned, there are a couple of conversion issues, but nothing that can’t be solved with a little common sense. Well worth the money if you got the time for a solo game. Hopefully Dark City Games will be pursuing this crossover in the future.
Sunday, November 29, 2009
October 7, 986 – Outskirts of Altengard
The alpha creature sniffed the air a second time sure now that there was food to be had at this small dwelling. Not only from within, but there were many large horses about. The real question was, how much blood would be on his massive axe when it was all said and done…
1 Alpha Lycan (Star) - REP 6, AC 4, Move 16, Hardiness 4; Weapon: Massive Axe
Terror, Magic Resist
Massive Axe: IMP 7
CV: 10
2 Brotherhood Lycan - REP 5, AC 4, Move 12, Hardiness 2; Weapon: Arm Blade
Arm blade: IMP 5
Frenzy, Magic Resist
CV: 6
3 Pack Lycan - REP 5, AC 4, Move 12, Hardiness 0; Weapon: Spear
Spear: IMP 5
Frenzy
CV: 2
Total CV: 28
Raid Encounter roll was an 8 so there are 28 CV of locals about. Since this was an inn, I decided that if I rolled doubles, the type would be: Drunk (CV: 1) – REP 3, AC 2, Move 8, Hardiness 0; Weapon: Improvised Weapon (IMP 3). There are no other buildings in the area, but there are four horses found in the corral on the opposite side of the road.
4 Knights, 2 Skirmishers, 6 Infantry (2 inside), 5 Arquebus (2 inside), 4 Drunks (2 inside), 3 Polearms (1 inside)

Stats for the other combatants are in the following format:
Name (REP/AC/move/Hardiness/RNG:IMP)
Knight (5/6/12/0/-:7 or 4)
Skirmishers (4/2/8/0/36:5)
Infantry (4/4/6/0/-:5)
Arquebus (4/3/6/0/24:7)
Polearm (4/3/6/0/-:6)
The defenders are set up in a random fashion. I split the board into 6 areas and I rolled a d6 for each figure. Once the location was determined, I placed them in a spot that I figured would be if they were on patrol. Funny how of the 24 figures only 7 are inside the inn. Word about the Lycans has spread and perhaps this raid is more of a trap???
As the Pack moves closer to the Inn, it appears that the humans are waiting for them. Hopefully how the human are spread out will help them keep their injuries to a minimum.
The alpha moves his group of pack lycans into melee. The human stand their ground in the test of wills (I knew I should have used the star ability and picked 6 successes instead of 4) and the lycans all charge. The arquebuser doesn’t manage to do anything with his shot, but the skirmisher manages to take a lycan OOF with a well-placed arrow! Both Knights hold their own even though they are outclassed. The poor drunk is sliced through without a care by the pack lycan and one of the knights retires a normal move on the crisis test! The Brotherhood lycans are unable to go due to the activation number.
The same skirmisher manages to take out another pack Lycan OOF. The arquebuser manages to hit the alpha, but the alpha shrugs off the blow, roars and moves to engage (with 3d vs 6d rolls well enough to hit, but then just forces a control test which the star ‘fails’ and engages in melee). The knight wants to charge in, but can’t manage to force himself to do it (the alpha star picks ‘6 successes’ and the knight can’t hope to beat him). The rest of the humans move to create groups in order to fight better (or fail to charge the final pack lycan.
 The lone skirmisher on the right is taking out the pack lycans without worry...
The alpha cleaves the arquebuser in half and the skirmisher ‘hero’ routs off the board. A second knight races over to help take out the final pack lycan and after a couple of minor successes manages to run him through (OD result). The rest of the humans stand in wait (I rolled a 6 for the lycans again and a 5 for the humans).
The alpha lycan moves to attack Lord Byron (the leader of this group) but they are evenly matched. The brotherhood lycans finally move into the battle, one charging an arquebuser who fails to hurt him as the lycan comes crashing close. The arquebusers screams of pain force a second arquebuser and a polearm fighter to flee in terror (both failed the crisis test). The second brotherhood lycan attempts to charge the last skirmisher, but halts in place instead (same number of successes on test of wills). The final skirmisher wastes no time in firing at the dumbfounded lycan hitting the foul beast and seriously wounding it (Since they are now within 12 inches, there isn’t a second test of wills so the skirmisher fires her short bow at the lycan rolling 3 successes to 2 hitting it. The result of OOF stands after rolling on the hardiness check)! The alpha seeing that he is outnumbered, fails the crisis test and retires (there are now only 2 lycans remaining).

The alpha retires off the board, but the brotherhood lycan doesn’t get the message. The skirmisher rounds the forest looking to take a shot, but misses and the lycan charges in. The second shot manages to hit, but doesn’t faze the lycan who rends the skirmisher in two which causes the nearest swordsman to flee (and a second to retire). The two knights on the flank dispatch both wounded pack lycans. The final lycan grabs his other brotherhood lycan buddy and flees off the table.
The encounter wasn’t a total loss muses the alpha after a couple of days. Sure the pack is smaller, but the two that survived are more powerful then when they started. Perhaps next time they will dine on horse flesh…
The alpha gained a Social status that it lost by fleeing the battlefield. One Brotherhood went up in REP and both went to hardiness 3.
The alpha creature sniffed the air a second time sure now that there was food to be had at this small dwelling. Not only from within, but there were many large horses about. The real question was, how much blood would be on his massive axe when it was all said and done…
1 Alpha Lycan (Star) - REP 6, AC 4, Move 16, Hardiness 4; Weapon: Massive Axe
Terror, Magic Resist
Massive Axe: IMP 7
CV: 10
2 Brotherhood Lycan - REP 5, AC 4, Move 12, Hardiness 2; Weapon: Arm Blade
Arm blade: IMP 5
Frenzy, Magic Resist
CV: 6
3 Pack Lycan - REP 5, AC 4, Move 12, Hardiness 0; Weapon: Spear
Spear: IMP 5
Frenzy
CV: 2
Total CV: 28
Raid Encounter roll was an 8 so there are 28 CV of locals about. Since this was an inn, I decided that if I rolled doubles, the type would be: Drunk (CV: 1) – REP 3, AC 2, Move 8, Hardiness 0; Weapon: Improvised Weapon (IMP 3). There are no other buildings in the area, but there are four horses found in the corral on the opposite side of the road.
4 Knights, 2 Skirmishers, 6 Infantry (2 inside), 5 Arquebus (2 inside), 4 Drunks (2 inside), 3 Polearms (1 inside)

Here is the setup for the raid. You can barely see the alpha and his pack on the right. The two brotherhood are on the far left.
Stats for the other combatants are in the following format:
Name (REP/AC/move/Hardiness/RNG:IMP)
Knight (5/6/12/0/-:7 or 4)
Skirmishers (4/2/8/0/36:5)
Infantry (4/4/6/0/-:5)
Arquebus (4/3/6/0/24:7)
Polearm (4/3/6/0/-:6)
The defenders are set up in a random fashion. I split the board into 6 areas and I rolled a d6 for each figure. Once the location was determined, I placed them in a spot that I figured would be if they were on patrol. Funny how of the 24 figures only 7 are inside the inn. Word about the Lycans has spread and perhaps this raid is more of a trap???
As the Pack moves closer to the Inn, it appears that the humans are waiting for them. Hopefully how the human are spread out will help them keep their injuries to a minimum.
The alpha moves his group of pack lycans into melee. The human stand their ground in the test of wills (I knew I should have used the star ability and picked 6 successes instead of 4) and the lycans all charge. The arquebuser doesn’t manage to do anything with his shot, but the skirmisher manages to take a lycan OOF with a well-placed arrow! Both Knights hold their own even though they are outclassed. The poor drunk is sliced through without a care by the pack lycan and one of the knights retires a normal move on the crisis test! The Brotherhood lycans are unable to go due to the activation number.
The same skirmisher manages to take out another pack Lycan OOF. The arquebuser manages to hit the alpha, but the alpha shrugs off the blow, roars and moves to engage (with 3d vs 6d rolls well enough to hit, but then just forces a control test which the star ‘fails’ and engages in melee). The knight wants to charge in, but can’t manage to force himself to do it (the alpha star picks ‘6 successes’ and the knight can’t hope to beat him). The rest of the humans move to create groups in order to fight better (or fail to charge the final pack lycan.
 The lone skirmisher on the right is taking out the pack lycans without worry...
 The alpha cleaves the arquebuser in half and the skirmisher ‘hero’ routs off the board. A second knight races over to help take out the final pack lycan and after a couple of minor successes manages to run him through (OD result). The rest of the humans stand in wait (I rolled a 6 for the lycans again and a 5 for the humans).
The alpha lycan moves to attack Lord Byron (the leader of this group) but they are evenly matched. The brotherhood lycans finally move into the battle, one charging an arquebuser who fails to hurt him as the lycan comes crashing close. The arquebusers screams of pain force a second arquebuser and a polearm fighter to flee in terror (both failed the crisis test). The second brotherhood lycan attempts to charge the last skirmisher, but halts in place instead (same number of successes on test of wills). The final skirmisher wastes no time in firing at the dumbfounded lycan hitting the foul beast and seriously wounding it (Since they are now within 12 inches, there isn’t a second test of wills so the skirmisher fires her short bow at the lycan rolling 3 successes to 2 hitting it. The result of OOF stands after rolling on the hardiness check)! The alpha seeing that he is outnumbered, fails the crisis test and retires (there are now only 2 lycans remaining).

How the tables have turned for the lycan. Who knew bows are the way to go!
The alpha retires off the board, but the brotherhood lycan doesn’t get the message. The skirmisher rounds the forest looking to take a shot, but misses and the lycan charges in. The second shot manages to hit, but doesn’t faze the lycan who rends the skirmisher in two which causes the nearest swordsman to flee (and a second to retire). The two knights on the flank dispatch both wounded pack lycans. The final lycan grabs his other brotherhood lycan buddy and flees off the table.
The encounter wasn’t a total loss muses the alpha after a couple of days. Sure the pack is smaller, but the two that survived are more powerful then when they started. Perhaps next time they will dine on horse flesh…
The alpha gained a Social status that it lost by fleeing the battlefield. One Brotherhood went up in REP and both went to hardiness 3.
Friday, November 6, 2009
Savage Worlds - Crown of Kings Round 2
Okay, after mulling over my “defeat” by the dragon in the last episode, I decided to do some research on Savage World combats. Thankfully, right on their website in the download section gives a one page survival guide to SW combat. After downloading, printing and reading, I wanted to face this dragon again with a couple of changes of strategy. Also, I wanted to count the number of rounds and see the time it took. Remember this is supposed to be a RPG game and a two-hour battle would try me as a gamer!
 Here is my setup for the game. The map is under a piece of plexiglass so I can use a wet erase marker to take notes. Notice all the game counters included with the game.
Started @ 2:14
Ended @ 3:07
Result: total party death in 11 turns…. How it happened:
Turn 1: Dragon is shaken by a great attack by Marcus, but it recovers quickly and causes a wound on Marcus after a soak roll. Merula casts deflection on Janine and Janine moves in and attacks the head (called shot), but fails to cause any damage
Turn 2: Dragon gets a joker and hits Marcus for 4 wounds and he begins to bleed out. Ramel fails to heal Marcus.
Turn 3: Marcus dies (a roll of 2 – 3 = death). Ramel intimidates the dragon with a success?!? Dragon recovers and hits Ramel but rolls a 6 for no result
Turn 4: Dragon again hits Ramel but only shakes him. Janine wild attacks to the head (the modifiers are in her favor; +1 for gang up, +1 for trademark weapon, +2 for wild attack and +2 for dragon’s size with the –4 for a called shot) and connects with a 27 (3 wounds). Of course, if the dragon gets the two GM Bennies, it uses one to soak. An awesome roll of 17 completely negates the damage.
Turn 6: Ramel hit for 3 wounds and is unable to soak them.
Turn 8: Janine hit for 5 wounds and soaks 1. On the Incapacation Table, she scores a raise meaning she is stunned, but is busted (die type loss to strength).
Turn 10: Janine hit for 5 more wounds and starts to bleed out. Ramel tries to flee combat, but is hit for 2 wounds. He also starts to bleeds.
Turn 11: Janine continues to bleed out; Ramel expires. Dragon hits Merula for 1 wound (she soaks 2), then two more wounds on the second attack. She Full defenses and tries to run, but gets hit while fleeing and receives another wound going unconscious…
Now I’m curious if my “new” play style is the cause of death or the awesome rolling/cards for the dragon at the beginning of the combat. I’m feeling that my tactics were sound, but the awesome cards that the dragon got was what did me in. Also, the two GM Bennies that I gave the dragon saved it when Janine did her wild attacks to the head. I sent a message to the Dark City guys to see if I’m suppose to be giving GM Bennies out, but I haven’t got an answer yet. Again, I’ll “reset the power button” and go at this again…
 Here is my setup for the game. The map is under a piece of plexiglass so I can use a wet erase marker to take notes. Notice all the game counters included with the game.
Started @ 2:14
Ended @ 3:07
Result: total party death in 11 turns…. How it happened:
Turn 1: Dragon is shaken by a great attack by Marcus, but it recovers quickly and causes a wound on Marcus after a soak roll. Merula casts deflection on Janine and Janine moves in and attacks the head (called shot), but fails to cause any damage
Turn 2: Dragon gets a joker and hits Marcus for 4 wounds and he begins to bleed out. Ramel fails to heal Marcus.
Turn 3: Marcus dies (a roll of 2 – 3 = death). Ramel intimidates the dragon with a success?!? Dragon recovers and hits Ramel but rolls a 6 for no result
Turn 4: Dragon again hits Ramel but only shakes him. Janine wild attacks to the head (the modifiers are in her favor; +1 for gang up, +1 for trademark weapon, +2 for wild attack and +2 for dragon’s size with the –4 for a called shot) and connects with a 27 (3 wounds). Of course, if the dragon gets the two GM Bennies, it uses one to soak. An awesome roll of 17 completely negates the damage.
Turn 6: Ramel hit for 3 wounds and is unable to soak them.
Turn 8: Janine hit for 5 wounds and soaks 1. On the Incapacation Table, she scores a raise meaning she is stunned, but is busted (die type loss to strength).
Turn 10: Janine hit for 5 more wounds and starts to bleed out. Ramel tries to flee combat, but is hit for 2 wounds. He also starts to bleeds.
Turn 11: Janine continues to bleed out; Ramel expires. Dragon hits Merula for 1 wound (she soaks 2), then two more wounds on the second attack. She Full defenses and tries to run, but gets hit while fleeing and receives another wound going unconscious…
Now I’m curious if my “new” play style is the cause of death or the awesome rolling/cards for the dragon at the beginning of the combat. I’m feeling that my tactics were sound, but the awesome cards that the dragon got was what did me in. Also, the two GM Bennies that I gave the dragon saved it when Janine did her wild attacks to the head. I sent a message to the Dark City guys to see if I’m suppose to be giving GM Bennies out, but I haven’t got an answer yet. Again, I’ll “reset the power button” and go at this again…
Subscribe to:
Posts (Atom)